Advanced Forms
by Ryan Weaver, Fabien Potencier
Symfony's form framework equips the developer with the tools necessary to easily render and validate form data in an object-oriented matter. Thanks to the ~sfFormDoctrine~ and ~sfFormPropel~ classes offered by each ORM, the form framework can easily render and save forms that relate closely to the data layer.
Real-world situations, however, often require the developer to customize and extend forms. In this chapter we'll present and solve several common, but challenging form problems. We'll also dissect the ~sfForm~ object and remove some of its mystery.
Mini-Project: Products & Photos
The first problem revolves around editing an individual product and an unlimited number of photos for that product. The user must be able to edit both the Product and the Product's Photos on the same form. We'll also need to allow the user to upload up to two new Product Photos at a time. Here is a possible schema:
PWhen completed, our form will look something like this:
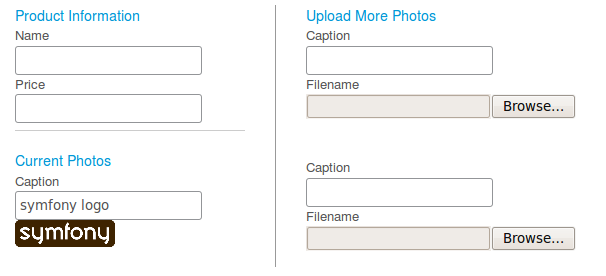
Learn more by doing the Examples
The best way to learn advanced techniques is to follow along and test the examples step by step. Thanks to the --installer feature of symfony, we provide a simple way for you to create a working project with a ready to be used SQLite database, the Doctrine database schema, some fixtures, a frontend application, and a product module to work with. Download the installer script and run the following command to create the symfony project:
$ php symfony generate:project advanced_form --installer=/path/to/advanced_form_installer.php
This command creates a fully-working project with the database schema we have introduced in the previous section.
In this chapter, the file paths are for a symfony project running with Doctrine as generated by the previous task.
Basic Form Setup
Because the requirements involve changes to two different models (Product and ProductPhoto), the solution will need to incorporate two different symfony forms (ProductForm and ProductPhotoForm). Fortunately, the form framework can easily combine multiple forms into one via ~sfForm::embedForm()~. First, setup the ProductPhotoForm independently. In this example, let's use the filename field as a file upload field:
// lib/form/doctrine/ProductPhotoForm.class.php
public function configure()
{
  $this->useFields(array('filename', 'caption'));

  $this->setWidget('filename', new sfWidgetFormInputFile());
  $this->setValidator('filename', new sfValidatorFile(array(
    'mime_types' => 'web_images',
    'path' => sfConfig::get('sf_upload_dir').'/products',
  )));
}
For this form, both the caption and filename fields are automatically required, but for different reasons. The caption field is required because the related column in the database schema has been defined with a notnull property set to true. The filename field is required by default because a validator object defaults to true for the required option.
~
sfForm::useFields()~ is a new function to symfony 1.3 that allows the developer to specify exactly which fields the form should use and in which order they should be displayed. All other non-hidden fields are removed from the form.
So far we've done nothing more than ordinary form setup. Next, we'll combine the forms into one.
Embedding Forms
By using ~sfForm::embedForm()~, the independent ProductForm and ProductPhotoForms can be combined with very little effort. The work is always done in the main form, which in this case is ProductForm. The requirements call for the ability to upload up to two product photos at once. To accomplish this, embed two ProductPhotoForm objects into ProductForm:
// lib/form/doctrine/ProductForm.class.php
public function configure()
{
  $subForm = new sfForm();
  for ($i = 0; $i < 2; $i++)
  {
    $productPhoto = new ProductPhoto();
    $productPhoto->Product = $this->getObject();

    $form = new ProductPhotoForm($productPhoto);

    $subForm->embedForm($i, $form);
  }
  $this->embedForm('newPhotos', $subForm);
}
If you point your browser to the product module, you now have the ability to upload two ProductPhotos as well as modify the Product object itself. Symfony automatically saves the new ProductPhoto objects and links them to the corresponding Product object. Even the file upload, defined in ProductPhotoForm, executes normally.
Check that the records are saved correctly in the database:
$ php symfony doctrine:dql --table "FROM Product"
$ php symfony doctrine:dql --table "FROM ProductPhoto"
In the ProductPhoto table, you will notice the filenames of the photos. Everything is working as expected if you can find files with the same names as the ones in the database in the web/uploads/products/ directory.
Because the filename and caption fields are required in
ProductPhotoForm, validation of the main form will always fail unless the user is uploading two new photos. Keep reading to learn how to fix this problem.
Refactoring
Even if the previous form works as expected, it would be better to refactor the code a bit to ease testing and to allow the code to be easily reused.
First, let's create a new form that represents a collection of ProductPhotoForms, based on the code we have already written:
// lib/form/doctrine/ProductPhotoCollectionForm.class.php
class ProductPhotoCollectionForm extends sfForm
{
  public function configure()
  {
    if (!$product = $this->getOption('product'))
    {
      throw new InvalidArgumentException('You must provide a product object.');
    }

    for ($i = 0; $i < $this->getOption('size', 2); $i++)
    {
      $productPhoto = new ProductPhoto();
      $productPhoto->Product = $product;

      $form = new ProductPhotoForm($productPhoto);

      $this->embedForm($i, $form);
    }
  }
}
This form needs two options:
-
product: The product for which to create a collection ofProductPhotoForms; -
size: The number ofProductPhotoForms to create (default to two).
You can now change the configure method of ProductForm to read as follows:
// lib/form/doctrine/ProductForm.class.php
public function configure()
{
  $form = new ProductPhotoCollectionForm(null, array(
    'product' => $this->getObject(),
    'size'    => 2,
  ));

  $this->embedForm('newPhotos', $form);
}
Dissecting the sfForm Object
In the most basic sense, a web form is a collection of fields that are rendered and submitted back to the server. In the same light, the ~sfForm~ object is essentially an array of form fields. While ~sfForm~ manages the process, the individual fields are responsible for defining how each will be rendered and validated.
In symfony, each form field is defined by two different objects:
-
A widget that outputs the form field's XHTML markup;
-
A validator that cleans and validates the submitted field data.
In symfony, a widget is defined as any object whose sole job is to output XHTML markup. While most commonly used with forms, a widget object could be created to output any markup.
A Form is an Array
Recall that the ~sfForm~ object is "essentially an array of form fields." To be more precise, sfForm houses both an array of widgets and an array of validators for all of the fields of the form. These two arrays, called widgetSchema and validatorSchema are properties of the sfForm class. In order to add a field to a form, we simply add the field's widget to the widgetSchema array and the field's validator to the validatorSchema array. For example, the following code would add an email field to a form:
public function configure()
{
  $this->widgetSchema['email'] = new sfWidgetFormInputText();
  $this->validatorSchema['email'] = new sfValidatorEmail();
}
The
widgetSchemaandvalidatorSchemaarrays are actually special classes called ~sfWidgetFormSchema~ and ~sfValidatorSchema~ that implement theArrayAccessinterface.
Dissecting the ProductForm
As the ProductForm class ultimately extends sfForm, it too houses all of its widgets and validators in widgetSchema and validatorSchema arrays. Let's look at how each array is organized in the finished ProductForm object.
widgetSchema    => array
(
  [id]          => sfWidgetFormInputHidden,
  [name]        => sfWidgetFormInputText,
  [price]       => sfWidgetFormInputText,
  [newPhotos]   => array(
    [0]           => array(
      [id]          => sfWidgetFormInputHidden,
      [filename]    => sfWidgetFormInputFile,
      [caption]     => sfWidgetFormInputText,
    ),
    [1]           => array(
      [id]          => sfWidgetFormInputHidden,
      [filename]    => sfWidgetFormInputFile,
      [caption]     => sfWidgetFormInputText,
    ),
  ),
)

validatorSchema => array
(
  [id]          => sfValidatorDoctrineChoice,
  [name]        => sfValidatorString,
  [price]       => sfValidatorNumber,
  [newPhotos]   => array(
    [0]           => array(
      [id]          => sfValidatorDoctrineChoice,
      [filename]    => sfValidatorFile,
      [caption]     => sfValidatorString,
    ),
    [1]           => array(
      [id]          => sfValidatorDoctrineChoice,
      [filename]    => sfValidatorFile,
      [caption]     => sfValidatorString,
    ),
  ),
)
Just as
widgetSchemaandvalidatorSchemaare actually objects that behave as arrays, the above arrays defined by the keysnewPhotos,0, and1are alsosfWidgetSchemaandsfValidatorSchemaobjects.
As expected, basic fields (id, name and price) are represented at the first level of each array. In a form that embeds no other forms, both the widgetSchema and validatorSchema arrays have just one level, representing the basic fields on the form. The widgets and validators of any embedded forms are represented as child arrays in widgetSchema and validatorSchema as seen above. The method that manages this process is explained next.
Behind ~sfForm::embedForm()~
Keep in mind that a form is composed of an array of widgets and an array of validators. Embedding one form into another essentially means that the widget and validator arrays of one form are added to the widget and validator arrays of the main form. This is entirely accomplished via sfForm::embedForm(). The result is always a multi-dimensional addition to the widgetSchema and validatorSchema arrays as seen above.
Below, we'll discuss the setup of ProductPhotoCollectionForm, which binds individual ProductPhotoForm objects into itself. This middle form acts as a "wrapper" form and helps with overall form organization. Let's begin with the following code from ProductPhotoCollectionForm::configure():
$form = new ProductPhotoForm($productPhoto);
$this->embedForm($i, $form);
The ProductPhotoCollectionForm form itself begins as a new sfForm object. As such, its widgetSchema and validatorSchema arrays are empty.
widgetSchema    => array()
validatorSchema => array()
Each ProductPhotoForm, however, is already prepared with three fields (id, filename, and caption) and three corresponding items in its widgetSchema and validatorSchema arrays.
widgetSchema    => array
(
  [id]            => sfWidgetFormInputHidden,
  [filename]      => sfWidgetFormInputFile,
  [caption]       => sfWidgetFormInputText,
)

validatorSchema => array
(
  [id]            => sfValidatorDoctrineChoice,
  [filename]      => sfValidatorFile,
  [caption]       => sfValidatorString,
)
The ~sfForm::embedForm()~ method simply adds the widgetSchema and validatorSchema arrays from each ProductPhotoForm to the widgetSchema and validatorSchema arrays of the empty ProductPhotoCollectionForm object.
When finished, the widgetSchema and validatorSchema arrays of the wrapper form (ProductPhotoCollectionForm) are multi-level arrays that hold the widgets and validators from both ProductPhotoForms.
widgetSchema    => array
(
  [0]             => array
  (
    [id]            => sfWidgetFormInputHidden,
    [filename]      => sfWidgetFormInputFile,
    [caption]       => sfWidgetFormInputText,
  ),
  [1]             => array
  (
    [id]            => sfWidgetFormInputHidden,
    [filename]      => sfWidgetFormInputFile,
    [caption]       => sfWidgetFormInputText,
  ),
)

validatorSchema => array
(
  [0]             => array
  (
    [id]            => sfValidatorDoctrineChoice,
    [filename]      => sfValidatorFile,
    [caption]       => sfValidatorString,
  ),
  [1]             => array
  (
    [id]            => sfValidatorDoctrineChoice,
    [filename]      => sfValidatorFile,
    [caption]       => sfValidatorString,
  ),
)
In the final step of our process, the resulting wrapper form, ProductPhotoCollectionForm, is embedded directly into ProductForm. This occurs inside ProductForm::configure(), which takes advantage of all the work that was done inside ProductPhotoCollectionForm:
$form = new ProductPhotoCollectionForm(null, array(
  'product' => $this->getObject(),
  'size'    => 2,
));

$this->embedForm('newPhotos', $form);
This gives us the final widgetSchema and validatorSchema array structure seen above. Notice that the embedForm() method is very similar to the simple act of combining the widgetSchema and validatorSchema arrays manually:
$this->widgetSchema['newPhotos'] = $form->getWidgetSchema();
$this->validatorSchema['newPhotos'] = $form->getValidatorSchema();
Rendering Embedded Forms in the View
The current _form.php template of the product module looks like the following:
// apps/frontend/module/product/templates/_form.php
<!-- ... -->

<tbody>
  <?php echo $form ?>
</tbody>

<!-- ... -->
The <?php echo $form ?> statement is the simplest way to display a form, even the most complex ones. It is of great help when prototyping, but as soon as you want to change the layout, you need to replace it with your own display logic. Remove this line now as we will replace it in this section.
The most important thing to understand when rendering embedded forms in the view is the organization of the multi-level widgetSchema array explained in the previous sections. For this example, let's begin by rendering the basic name and price fields from the ProductForm in the view:
// apps/frontend/module/product/templates/_form.php
<?php echo $form['name']->renderRow() ?>

<?php echo $form['price']->renderRow() ?>

<?php echo $form->renderHiddenFields() ?>
As its name implies, the renderHiddenFields() renders all the hidden fields of the form.
The actions code was purposefully not shown here because it requires no special attention. Have a look at the
apps/frontend/modules/product/actions/actions.class.phpactions file. It looks like any normal CRUD and can be generated automatically via thedoctrine:generate-moduletask.
As we've already learned, the sfForm class houses the widgetSchema and validatorSchema arrays that define our fields. Moreover, the sfForm class implements the native PHP 5 ArrayAccess interface, meaning we can directly access fields of the form by using the array key syntax seen above.
To output the fields, you can simply access them directly and call the renderRow() method. But what type of object is $form['name']? While you might expect the answer to be the sfWidgetFormInputText widget for the name field, the answer is actually something slightly different.
Rendering each Form Field with ~sfFormField~
By using the widgetSchema and validatorSchema arrays defined in each form class, sfForm automatically generates a third array called sfFormFieldSchema. This array contains a special object for each field that acts as a helper class responsible for the field's output. The object, of type ~sfFormField~, is a combination of each field's widget and validator and is automatically created.
<?php echo $form['name']->renderRow() ?>
In the above snippet, $form['name'] is an sfFormField object, which houses the renderRow() method along with several other useful rendering functions.
sfFormField Rendering Methods
Each sfFormField object can be used to easily render every aspect of the field that it represents (e.g. the field itself, the label, error messages, etc.). Some of the useful methods inside sfFormField include the following. Other can be found via the symfony 1.3 API.
-
sfFormField->render(): Renders the form field (e.g.input,select) with the correct value using the field's widget object. -
sfFormField->renderError(): Renders any validation errors on the field using the field's validator object. -
sfFormField->renderRow(): All-encompassing: renders the label, the form field, the error and the help message inside an XHTML markup wrapper.
In reality, each rendering function of the
sfFormFieldclass also uses information from the form'swidgetSchemaproperty (thesfWidgetFormSchemaobject that houses all of the widgets for the form). This class assists in the generation of each field'snameandidattributes, keeps track of the label for each field, and defines the XHTML markup used withrenderRow().
One important thing to note is that the formFieldSchema array always mirrors the structure of the form's widgetSchema and validatorSchema arrays. For example, the formFieldSchema array of the completed ProductForm would have the following structure, which is the key to rendering each field in the view:
formFieldSchema    => array
(
  [id]          => sfFormField
  [name]        => sfFormField,
  [price]       => sfFormField,
  [newPhotos]   => array(
    [0]           => array(
      [id]          => sfFormField,
      [filename]    => sfFormField,
      [caption]     => sfFormField,
    ),
    [1]           => array(
      [id]          => sfFormField,
      [filename]    => sfFormField,
      [caption]     => sfFormField,
    ),
  ),
)
Rendering the New ProductForm
Using the above array as our map, we can easily output the embedded ProductPhotoForm fields in the view by locating and rendering the proper sfFormField objects:
// apps/frontend/module/product/templates/_form.php
<?php foreach ($form['newPhotos'] as $photo): ?>
  <?php echo $photo['caption']->renderRow() ?>
  <?php echo $photo['filename']->renderRow() ?>
<?php endforeach; ?>
The above block loops twice: once for the 0 form field array and once for the 1 form field array. As seen in the above diagram, the underlying objects of each array are sfFormField objects, which we can output like any other fields.
Saving Object Forms
Under most circumstances, a form will relate directly to one or more database tables and trigger changes to the data in those tables based on the submitted values. Symfony automatically generates a form object for each schema model, which extends either sfFormDoctrine or sfFormPropel depending on your ORM. Each form class is similar and ultimately allows for submitted values to be easily persisted in the database.
~
sfFormObject~ is a new class added in symfony 1.3 to handle all of the common tasks ofsfFormDoctrineandsfFormPropel. Each class extendssfFormObject, which now manages part of the form-saving process described below.
The Form Saving Process
In our example, symfony automatically saves both the Product information and new ProductPhoto objects without any additional effort by the developer. The method that triggers the magic, ~sfFormObject::save()~, executes a variety of methods behind the scenes. Understanding this process is key to extending the process in more advanced situations.
The form saving process consists of a series of internally executed methods, all of which happen after calling ~sfFormObject::save()~. The majority of the work is wrapped in the ~sfFormObject::updateObject()~ method, which is called recursively on all of your embedded forms.

The majority of the saving process takes place from within the ~
sfFormObject::doSave()~ method, which is called bysfFormObject::save()and wrapped in a database transaction. If you need to modify the saving process itself,sfFormObject::doSave()is usually the best place to do it.
Ignoring Embedded Forms
The current ProductForm implementation has one major shortfall. Because the filename and caption fields are required in ProductPhotoForm, validation of the main form will always fail unless the user is uploading two new photos. In other words, the user can't simply change the price of the Product without also being required to upload two new photos.
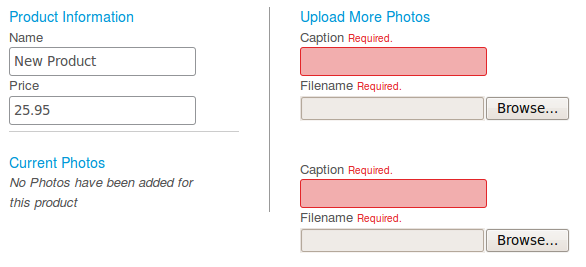
Let's redefine the requirements to include the following. If the user leaves all the fields of a ProductPhotoForm blank, that form should be ignored completely. However, if at least one field has data (i.e. caption or filename), the form should validate and save normally. To accomplish this, we'll employ an advanced technique involving the use of a custom post validator.
The first step, however, is to modify the ProductPhotoForm form to make the caption and filename fields optional:
// lib/form/doctrine/ProductPhotoForm.class.php
public function configure()
{
  $this->setValidator('filename', new sfValidatorFile(array(
    'mime_types' => 'web_images',
    'path' => sfConfig::get('sf_upload_dir').'/products',
    'required' => false,
  )));

  $this->validatorSchema['caption']->setOption('required', false);
}
In the above code, we have set the required option to false when overriding the default validator for the filename field. Additionally, we have explicitly set the required option of the caption field to false.
Now, let's add the post validator to the ProductPhotoCollectionForm:
// lib/form/doctrine/ProductPhotoCollectionForm.class.php
public function configure()
{
  // ...

  $this->mergePostValidator(new ProductPhotoValidatorSchema());
}
A post validator is a special type of validator that validates across all of the submitted values (as opposed to validating the value of a single field). One of the most common post validators is sfValidatorSchemaCompare which verifies, for example, that one field is less than another field.
Creating a Custom Validator
Fortunately, creating a custom validator is actually quite easy. Create a new file, ProductPhotoValidatorSchema.class.php and place it in the lib/validator/ directory (you'll need to create this directory):
// lib/validator/ProductPhotoValidatorSchema.class.php
class ProductPhotoValidatorSchema extends sfValidatorSchema
{
  protected function configure($options = array(), $messages = array())
  {
    $this->addMessage('caption', 'The caption is required.');
    $this->addMessage('filename', 'The filename is required.');
  }

  protected function doClean($values)
  {
    $errorSchema = new sfValidatorErrorSchema($this);

    foreach($values as $key => $value)
    {
      $errorSchemaLocal = new sfValidatorErrorSchema($this);

      // filename is filled but no caption
      if ($value['filename'] && !$value['caption'])
      {
        $errorSchemaLocal->addError(new sfValidatorError($this, 'required'), 'caption');
      }

      // caption is filled but no filename
      if ($value['caption'] && !$value['filename'])
      {
        $errorSchemaLocal->addError(new sfValidatorError($this, 'required'), 'filename');
      }

      // no caption and no filename, remove the empty values
      if (!$value['filename'] && !$value['caption'])
      {
        unset($values[$key]);
      }

      // some error for this embedded-form
      if (count($errorSchemaLocal))
      {
        $errorSchema->addError($errorSchemaLocal, (string) $key);
      }
    }

    // throws the error for the main form
    if (count($errorSchema))
    {
      throw new sfValidatorErrorSchema($this, $errorSchema);
    }

    return $values;
  }
}
All validators extend
sfValidatorBaseand require only thedoClean()method. Theconfigure()method can also be used to add options or messages to the validator. In this case, two messages are added to the validator. Similarly, additional options can be added via theaddOption()method.
The doClean() method is responsible for cleaning and validating the bound values. The logic of the validator itself is quite simple:
-
If a photo is submitted with only the filename or a caption, we throw an error (
sfValidatorErrorSchema) with the appropriate message; -
If a photo is submitted with no filename and no caption, we remove the values altogether to avoid saving an empty photo;
-
If no validation errors have occurred, the method returns the array of cleaned values.
Because the custom validator in this situation is meant to be used as a post validator, the
doClean()method expects an array of the bound values and returns an array of cleaned values. Custom validators, however, can just as easily be created for individual fields. In that case, thedoClean()method will expect just one value (the value of the submitted field) and will return just one value.
The last step is to override the saveEmbeddedForms() method of ProductForm to remove empty photo forms to avoid saving an empty photo in the database (it would otherwise throws an exception as the caption column is required):
public function saveEmbeddedForms($con = null, $forms = null)
{
  if (null === $forms)
  {
    $photos = $this->getValue('newPhotos');
    $forms = $this->embeddedForms;
    foreach ($this->embeddedForms['newPhotos'] as $name => $form)
    {
      if (!isset($photos[$name]))
      {
        unset($forms['newPhotos'][$name]);
      }
    }
  }

  return parent::saveEmbeddedForms($con, $forms);
}
Easily Embedding Doctrine-Related Forms
New to symfony 1.3 is the ~sfFormDoctrine::embedRelation()~ function which allows the developer to embed n-to-many relationship into a form automatically. Suppose, for example, that in addition to allowing the user to upload two new ProductPhotos, we also want to allow the user to modify the existing ProductPhoto objects related to this Product.
Next, use the embedRelation() method to add one additional ProductPhotoForm object for each existing ProductPhoto object:
// lib/form/doctrine/ProductForm.class.php
public function configure()
{
  // ...

  $this->embedRelation('Photos');
}
Internally, ~sfFormDoctrine::embedRelation()~ does almost exactly what we did manually to embed our two new ProductPhotoForm objects. If two ProductPhoto relations exist already, then the resulting widgetSchema and validatorSchema of our form would take the following shape:
widgetSchema    => array
(
  [id]          => sfWidgetFormInputHidden,
  [name]        => sfWidgetFormInputText,
  [price]       => sfWidgetFormInputText,
  [newPhotos]   => array(...)
  [Photos]      => array(
    [0]           => array(
      [id]          => sfWidgetFormInputHidden,
      [caption]     => sfWidgetFormInputText,
    ),
    [1]           => array(
      [id]          => sfWidgetFormInputHidden,
      [caption]     => sfWidgetFormInputText,
    ),
  ),
)

validatorSchema => array
(
  [id]          => sfValidatorDoctrineChoice,
  [name]        => sfValidatorString,
  [price]       => sfValidatorNumber,
  [newPhotos]   => array(...)
  [Photos]      => array(
    [0]           => array(
      [id]          => sfValidatorDoctrineChoice,
      [caption]     => sfValidatorString,
    ),
    [1]           => array(
      [id]          => sfValidatorDoctrineChoice,
      [caption]     => sfValidatorString,
    ),
  ),
)
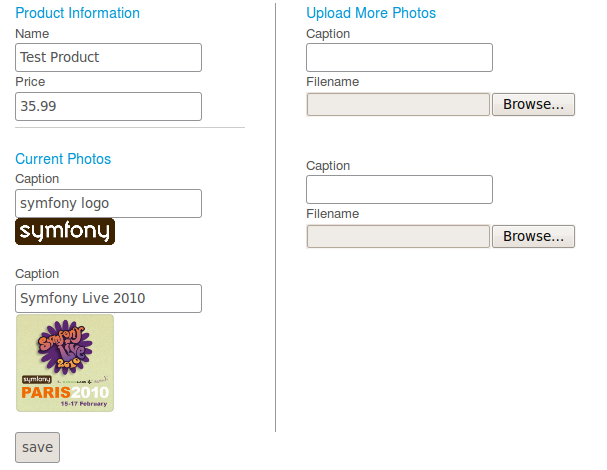
The next step is to add code to the view that will render the new embedded Photo forms:
// apps/frontend/module/product/templates/_form.php
<?php foreach ($form['Photos'] as $photo): ?>
  <?php echo $photo['caption']->renderRow() ?>
  <?php echo $photo['filename']->renderRow(array('width' => 100)) ?>
<?php endforeach; ?>
This snippet is exactly the one we used earlier to embed the new photo forms.
The last step is to convert the file upload field by one which allows the user to see the current photo and to change it by a new one (sfWidgetFormInputFileEditable):
public function configure()
{
  $this->useFields(array('filename', 'caption'));

  $this->setValidator('filename', new sfValidatorFile(array(
    'mime_types' => 'web_images',
    'path' => sfConfig::get('sf_upload_dir').'/products',
    'required' => false,
  )));

  $this->setWidget('filename', new sfWidgetFormInputFileEditable(array(
    'file_src'    => '/uploads/products/'.$this->getObject()->filename,
    'edit_mode'   => !$this->isNew(),
    'is_image'    => true,
    'with_delete' => false,
  )));

  $this->validatorSchema['caption']->setOption('required', false);
}
Form Events
New to symfony 1.3 are form events that can be used to extend any form object from anywhere in the project. Symfony exposes the following four form events:
form.post_configure: This event is notified after every form is configuredform.filter_values: This event filters the merged, tainted parameters and files arrays just prior to bindingform.validation_error: This event is notified whenever form validation failsform.method_not_found: This event is notified whenever an unknown method is called
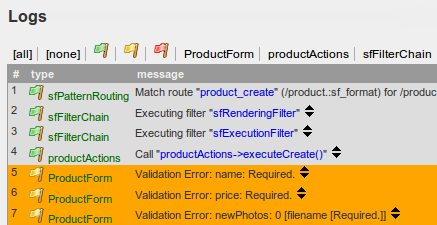
Custom Logging via form.validation_error
Using the form events, it's possible to add custom logging for validation errors on any form in your project. This might be useful if you want to track which forms and fields are causing confusion for your users.
Begin by registering a listener with the event dispatcher for the form.validation_error event. Add the following to the setup() method of ProjectConfiguration, which is located inside the config directory:
public function setup()
{
  // ...

  $this->getEventDispatcher()->connect(
    'form.validation_error',
    array('BaseForm', 'listenToValidationError')
  );
}
BaseForm, located in lib/form, is a special form class that all form classes extend. Essentially, BaseForm is a class where code can be placed and accessed by all form objects across the project. To enable logging of validation errors, simply add the following to the BaseForm class:
public static function listenToValidationError($event)
{
  foreach ($event['error'] as $key => $error)
  {
    self::getEventDispatcher()->notify(new sfEvent(
      $event->getSubject(),
      'application.log',
      array (
        'priority' => sfLogger::NOTICE,
        sprintf('Validation Error: %s: %s', $key, (string) $error)
      )
    ));
  }
}
Custom Styling when a Form Element has an Error
As a final exercise, let's turn to a slightly lighter topic related to the styling of form elements. Suppose, for example, that the design for the Product page includes special styling for fields that have failed validation.
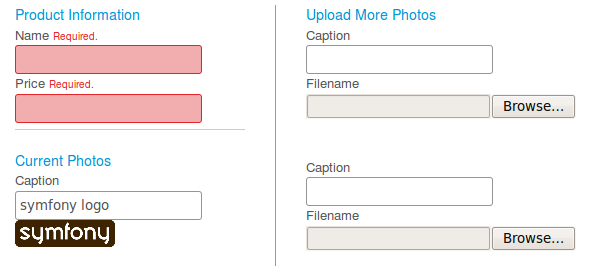
Suppose your designer has already implemented the stylesheet that will apply the error styling to any input field inside a div with the class form_error_row. How can we easily add the form_row_error class to the fields with errors?
The answer lies in a special object called a form schema formatter. Every symfony form uses a form schema formatter to determine the exact html formatting to use when outputting the form elements. By default, symfony uses a form formatter that employs HTML table tags.
First, let's create a new form schema formatter class that employs slightly lighter markup when outputting the form. Create a new file named sfWidgetFormSchemaFormatterAc2009.class.php and place it in the lib/widget/ directory (you'll need to create this directory):
class sfWidgetFormSchemaFormatterAc2009 extends sfWidgetFormSchemaFormatter
{
  protected
    $rowFormat       = "<div class=\"form_row\">
                        %label% \n %error% <br/> %field%
                        %help% %hidden_fields%\n</div>\n",
    $errorRowFormat  = "<div>%errors%</div>",
    $helpFormat      = '<div class="form_help">%help%</div>',
    $decoratorFormat = "<div>\n  %content%</div>";
}
Though the format of this class is strange, the general idea is that the renderRow() method will use the $rowFormat markup to organize its output. A form schema formatter class offers many other formatting options which I won't cover here in detail. For more information, consult the symfony 1.3 API.
To use the new form schema formatter across all form objects in your project, add the following to ProjectConfiguration:
class ProjectConfiguration extends sfProjectConfiguration
{
  public function setup()
  {
    // ...

    sfWidgetFormSchema::setDefaultFormFormatterName('ac2009');
  }
}
The goal is to add a form_row_error class to the form_row div element only if a field has failed validation. Add a %row_class% token to the $rowFormat property and override the ~sfWidgetFormSchemaFormatter::formatRow()~ method as follows:
class sfWidgetFormSchemaFormatterAc2009 extends sfWidgetFormSchemaFormatter
{
  protected
    $rowFormat       = "<div class=\"form_row%row_class%\">
                        %label% \n %error% <br/> %field%
                        %help% %hidden_fields%\n</div>\n",
    // ...

  public function formatRow($label, $field, $errors = array(), $help = '', $hiddenFields = null)
  {
    $row = parent::formatRow(
      $label,
      $field,
      $errors,
      $help,
      $hiddenFields
    );

    return strtr($row, array(
      '%row_class%' => (count($errors) > 0) ? ' form_row_error' : '',
    ));
  }
}
With this addition, each element that is output via the renderRow() method will automatically be surrounded by a form_row_error div if the field has failed validation.
Final Thoughts
The form framework is simultaneously one of the most powerful and most complex components inside symfony. The trade-off for tight form validation, CSRF protection, and object forms is that extending the framework can quickly become a daunting task. Gaining a deeper understanding of the form system, however, is the key toward unlocking its potential. I hope this chapter has taken you one step closer.
Future development of the form framework will focus on preserving the power while decreasing complexity and giving more flexibility to the developer. The form framework is only now in its infancy.
インデックス
Document Index
-
Advanced Forms
- Mini-Project: Products & Photos
- Learn more by doing the Examples
- Basic Form Setup
- Embedding Forms
- Refactoring
- Dissecting the sfForm Object
- Rendering Embedded Forms in the View
- Saving Object Forms
- Ignoring Embedded Forms
- Easily Embedding Doctrine-Related Forms
- Form Events
- Custom Styling when a Form Element has an Error
- Final Thoughts
関連ページリスト
Related Pages
 Introduction
 Advanced Routing
 Enhance your Productivity
 Emails
 Custom Widgets and Validators
 Advanced Forms
 Extending the Web Debug Toolbar
 Advanced Doctrine Usage
 Taking Advantage of Doctrine Table Inheritance
 Symfony Internals
 Windows and symfony
 Developing for Facebook
 Leveraging the Power of the Command Line
 Playing with symfony's Config Cache
 Working with the symfony Community
 Appendix A - JavaScript code for sfWidgetFormGMapAddress
 About the Authors
 Appendix B - Custom Installer Example
 Appendix C - License

日本語ドキュメント
Japanese Documents
 2011/01/18 Chapter 17 - Extending Symfony
 2011/01/18 The generator.yml Configuration File
 2011/01/18 Les tâches
 2011/01/18 Emails
 2010/11/26 blogチュートリアル(8) ビューの作成


