Chapter 3 - Running Symfony
As you've learned in previous chapters, the symfony framework is a set of files written in PHP. A symfony project uses these files, so installing symfony means getting these files and making them available for the project.
Symfony requires at least PHP 5.2.4. Make sure you have it installed by opening a command line and typing this command:
$ php -v

PHP 5.3.1 (cli) (built: Jan  6 2010 20:54:10)
Copyright (c) 1997-2009 The PHP Group
Zend Engine v2.3.0, Copyright (c) 1998-2009 Zend Technologies
If the version number is 5.2.4 or higher, then you're ready for the installation, as described in this chapter.
Prerequisites
Before installing symfony, you need to check that your computer has everything installed and configured correctly. Take the time to conscientiously read this chapter and follow all the steps required to check your configuration, as it may save your day further down the road.
Third-Party Software
First of all, you need to check that your computer has a friendly working environment for web development. At a minimum, you need a web server (Apache, for instance), a database engine (MySQL, PostgreSQL, SQLite, or any PDO-compatible database engine), and PHP 5.2.4 or later.
Command Line Interface
The symfony framework comes bundled with a command line tool that automates a lot of work for you. If you are a Unix-like OS user, you will feel right at home. If you run a Windows system, it will also work fine, but you will just have to type a few commands at the cmd prompt.
Unix shell commands can come in handy in a Windows environment. If you would like to use tools like
tar,gziporgrepon Windows, you can install Cygwin. The adventurous may also like to try Microsoft's Windows Services for Unix.
PHP Configuration
As PHP configurations can vary a lot from one OS to another, or even between different Linux distributions, you need to check that your PHP configuration meets the symfony minimum requirements.
First, ensure that you have PHP 5.2.4 as a minimum installed by using the phpinfo() built-in function or by running php -v on the command line. Be aware that on some configurations, you might have two different PHP versions installed: one for the command line, and another for the web.
Then, download the symfony configuration checker script at the following URL:
http://sf-to.org/1.4/check.php
Save the script somewhere under your current web root directory.
Launch the configuration checker script from the command line:
$ php check_configuration.php
If there is a problem with your PHP configuration, the output of the command will give you hints on what to fix and how to fix it.
You should also execute the checker from a browser and fix the issues it might discover. That's because PHP can have a distinct php.ini configuration file for these two environments, with different settings.
Don't forget to remove the file from your web root directory afterwards.
If your goal is to give symfony a try for a few hours, you can install the symfony sandbox as described at the end of this chapter. If you want to bootstrap a real world project or want to learn more about symfony, keep reading.
Symfony Installation
Initializing the Project Directory
Before installing symfony, you first need to create a directory that will host all the files related to your project:
$ mkdir -p /home/sfproject
$ cd /home/sfproject
Or on Windows:
c:\> mkdir c:\dev\sfproject
c:\> cd c:\dev\sfproject
Windows users are advised to run symfony and to setup their new project in a path which contains no spaces. Avoid using the
Documents and Settingsdirectory, including anywhere underMy Documents.
If you create the symfony project directory under the web root directory, you won't need to configure your web server. Of course, for production environments, we strongly advise you to configure your web server as explained in the web server configuration section.
Choosing the Symfony Version
Now, you need to install symfony. As the symfony framework has several stable versions, you need to choose the one you want to install by reading the installation page on the symfony website.
Choosing the Symfony Installation Location
You can install symfony globally on your machine, or embed it into each of your projects. The latter is the recommended approach as projects will then be totally independent from each other and ugrading your locally installed symfony won't break some of your projects unexpectedly. It also means you will be able to have projects using different versions of symfony, and upgrade them one at a time as you see fit.
As a best practice, many people install the symfony framework files in the lib/vendor project directory. So, first, create this directory:
$ mkdir -p lib/vendor
Installing Symfony
Installing from an archive
The easiest way to install symfony is to download the archive for the version you choose from the symfony website. Go to the installation page for the version you have just chosen, symfony 1.4 for instance.
Under the "Source Download" section, you will find the archive in .tgz or in .zip format. Download the archive, put it under the freshly created lib/vendor/ directory, un-archive it, and rename the directory to symfony:
$ cd lib/vendor
$ tar zxpf symfony-1.4.0.tgz
$ mv symfony-1.4.0 symfony
$ rm symfony-1.4.0.tgz
Under Windows, unzipping the zip file can be achieved using Windows Explorer. After you rename the directory to symfony, there should be a directory structure similar to c:\dev\sfproject\lib\vendor\symfony.
Installing from Subversion (recommended)
If your project use Subversion, it is even better to use the svn:externals property to embed symfony into your project in the lib/vendor/ directory:
$ svn pe svn:externals lib/vendor/
If everything goes well, this command will run your favorite editor to give you the opportunity to configure the external Subversion sources.
On Windows, you can use tools like TortoiseSVN to do everything without the need to use the console.
If you are conservative, tie your project to a specific release (a subversion tag):
symfony http://svn.symfony-project.com/tags/RELEASE_1_4_0
Whenever a new release comes out (as announced on the symfony blog), you will need to change the URL to the new version.
If you want to go the bleeding-edge route, use the 1.4 branch:
symfony http://svn.symfony-project.com/branches/1.4/
Using the branch makes your project benefit from bug fixes automatically whenever you run an svn update.
Installation Verification
Now that symfony is installed, check that everything is working by using the symfony command line to display the symfony version (note the capital V):
$ cd ../..
$ php lib/vendor/symfony/data/bin/symfony -V
On Windows:
c:\> cd ..\..
c:\> php lib\vendor\symfony\data\bin\symfony -V
After you have created your project (below), running this command also displays the path to the symfony installation directory, which is stored in config/ProjectConfiguration.class.php.
If when you check this, the path to symfony is an absolute one (which should not be by default if you follow the below instructions), change it so it reads like follows for better portability:
// config/ProjectConfiguration.class.php
require_once dirname(__FILE__).'/../lib/vendor/symfony/lib/autoload/sfCoreAutoload.class.php';
That way, you can move the project directory anywhere on your machine or another one, and it will just work.
If you are curious about what this command line tool can do for you, type
symfonyto list the available options and tasks:$ php lib/vendor/symfony/data/bin/symfonyOn Windows:
c:\> php lib\vendor\symfony\data\bin\symfonyThe symfony command line is the developer's best friend. It provides a lot of utilities that improve your productivity for day-to-day activities like cleaning the cache, generating code, and much more.
Project Setup
In symfony, applications sharing the same data model are regrouped into projects. For most projects, you will have two different applications: a frontend and a backend.
Project Creation
From the sfproject/ directory, run the symfony generate:project task to actually create the symfony project:
$ php lib/vendor/symfony/data/bin/symfony generate:project PROJECT_NAME
On Windows:
c:\> php lib\vendor\symfony\data\bin\symfony generate:project PROJECT_NAME
The generate:project task generates the default structure of directories and files needed for a symfony project.
Why does symfony generate so many files? One of the main benefits of using a full-stack framework is to standardize your development. Thanks to symfony's default structure of files and directories, any developer with some symfony knowledge can take over the maintenance of any symfony project. In a matter of minutes, he will be able to dive into the code, fix bugs, and add new features.
The generate:project task has also created a symfony shortcut in the project root directory to shorten the number of characters you have to write when running a task.
So, from now on, instead of using the fully qualified path to the symfony program, you can use the symfony shortcut.
Configuring the Database
The symfony framework supports all PDO-supported databases (MySQL, PostgreSQL, SQLite, Oracle, MSSQL, ...) out of the box. On top of PDO, symfony comes bundled with two ORM tools: Propel and Doctrine.
When creating a new project, Doctrine is enabled by default. Configuring the database used by Doctrine is as simple as using the configure:database task:
$ php symfony configure:database "mysql:host=localhost;dbname=dbname" root mYsEcret
The configure:database task takes three arguments: the ~PDO DSN~, the username, and the password to access the database. If you don't need a password to access your database on the development server, just omit the third argument.
If you want to use Propel instead of Doctrine, add
--orm=Propelwhen creating the project with thegenerate:projecttask. And if you don't want to use an ORM, just pass--orm=none.
Application Creation
Now, create the frontend application by running the generate:app task:
$ php symfony generate:app frontend
Because the symfony shortcut file is executable, Unix users can replace all occurrences of '
php symfony' by './symfony' from now on.On Windows you can copy the '
symfony.bat' file to your project and use 'symfony' instead of 'php symfony':c:\> copy lib\vendor\symfony\data\bin\symfony.bat .
Based on the application name given as an argument, the generate:app task creates the default directory structure needed for the application under the apps/frontend/ directory.
Security
By default, the
generate:apptask has secured our application from the two most widespread vulnerabilities found on the web. That's right, symfony automatically takes ~security|Security~ measures on our behalf.To prevent ~XSS~ attacks, output escaping has been enabled; and to prevent ~CSRF~ attacks, a random CSRF secret has been generated.
Of course, you can tweak these settings thanks to the following options:
--escaping-strategy: Enables or disables output escaping--csrf-secret: Enables session tokens in formsIf you know nothing about XSS or CSRF, take the time to learn more about these security vulnerabilities.
Directory Structure Rights
Before trying to access your newly created project, you need to set the write permissions on the cache/ and log/ directories to the appropriate levels, so that both your web server and command line user can write to them:
$ symfony project:permissions
Tips for People using an SCM Tool
symfony only ever writes to two directories of a symfony project,
cache/andlog/. The content of these directories should be ignored by your SCM (by editing thesvn:ignoreproperty if you use Subversion for instance).
Web Server Configuration
The ugly Way
In the previous chapters, you have created a directory that hosts the project. If you have created it somewhere under the web root directory of your web server, you can already access the project in a web browser.
Of course, as there is no configuration, it is very fast to set up, but try to access the config/databases.yml file in your browser to understand the bad consequences of such a lazy attitude. If the user knows that your website is developed with symfony, he will have access to a lot of sensitive files.
Never ever use this setup on a production server, and read the next section to learn how to configure your web server properly.
The secure Way
A good web practice is to only put the files that need to be accessed by a web browser under the web root directory , such as stylesheets, JavaScripts and images. By default, we recommend storing these files under the web/ sub-directory of a symfony project.
If you have a look at this directory, you will find some sub-directories for web assets (css/ and images/) and the two front controller files. The front controllers are the only PHP files that need to be under the web root directory. All other PHP files can be hidden from the browser, which is a good idea as far as security is concerned.
Web Server Configuration
Now it is time to change your Apache configuration, to make the new project accessible to the world.
Locate and open the httpd.conf configuration file and add the following configuration at the end:
# Be sure to only have this line once in your configuration
NameVirtualHost 127.0.0.1:8080

# This is the configuration for your project
Listen 127.0.0.1:8080

<VirtualHost 127.0.0.1:8080>
  DocumentRoot "/home/sfproject/web"
  DirectoryIndex index.php
  <Directory "/home/sfproject/web">
    AllowOverride All
    Allow from All
  </Directory>

  Alias /sf /home/sfproject/lib/vendor/symfony/data/web/sf
  <Directory "/home/sfproject/lib/vendor/symfony/data/web/sf">
    AllowOverride All
    Allow from All
  </Directory>
</VirtualHost>
The
/sfalias gives you access to images and javascript files needed to properly display default symfony pages and the web debug toolbar.On Windows, you need to replace the
Aliasline with something like:Alias /sf "c:\dev\sfproject\lib\vendor\symfony\data\web\sf"And
/home/sfproject/webshould be replaced with:c:\dev\sfproject\web
This configuration makes Apache listen to port 8080 on your machine, so the website will be accessible at the following URL:
http://localhost:8080/
You can change 8080 to any number, but favour numbers greater than 1024 as they do not require administrator rights.
Configure a dedicated Domain Name
If you are an administrator on your machine, it is better to setup virtual hosts instead of adding a new port each time you start a new project. Instead of choosing a port and adding a
Listenstatement, choose a domain name (for instance the real domain name with.localhostadded at the end) and add aServerNamestatement:# This is the configuration for your project <VirtualHost 127.0.0.1:80> ServerName www.myproject.com.localhost </VirtualHost>The domain name
www.myproject.com.localhostused in the Apache configuration has to be declared locally. If you run a Linux system, it has to be done in the/etc/hostsfile. If you run Windows XP, Vista or Win7, this file is located in theC:\WINDOWS\system32\drivers\etc\directory.Add the following line:
127.0.0.1 www.myproject.com.localhost
Test the New Configuration
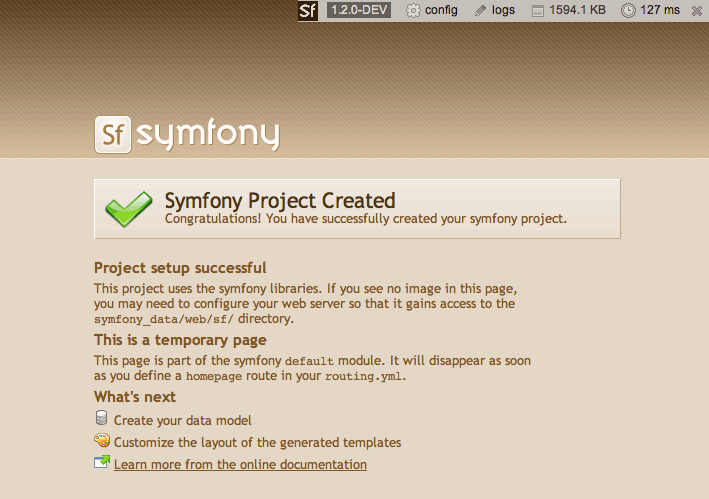
Restart Apache, and check that you now have access to the new application by opening a browser and typing http://localhost:8080/index.php/, or http://www.myproject.com.localhost/index.php/ depending on the Apache configuration you chose in the previous section.

If you have the Apache
mod_rewritemodule installed, you can remove theindex.php/part of the URL. This is possible thanks to the rewriting rules configured in theweb/.htaccessfile.
You should also try to access the application in the development environment (see the next section for more information about environments). Type in the following URL:
http://www.myproject.com.localhost/frontend_dev.php/
The web debug toolbar should show in the top right corner, including small icons proving that your sf/ alias configuration is correct.
The setup is a little different if you want to run symfony on an IIS server in a Windows environment. Find how to configure it in the related tutorial.
Using the Sandbox
If your goal is to give symfony a try for a few hours, keep reading this chapter as we will show you the fastest way to get you started.
The fastest way to experiment with symfony is to install the symfony sandbox. The sandbox is a dead-easy-to-install pre-packaged symfony project, already configured with some sensible defaults. It is a great way to practice using symfony without the hassle of a proper installation that respects the web best practices.
As the sandbox is pre-configured to use SQLite as a database engine, you need to check that your PHP supports SQLite. You can also read the Configuring the Database section to learn how to change the database used by the sandbox.
You can download the symfony sandbox in .tgz or .zip format from the symfony installation page or at the following URLs:
http://www.symfony-project.org/get/sf_sandbox_1_4.tgz

http://www.symfony-project.org/get/sf_sandbox_1_4.zip
Un-archive the files somewhere under your web root directory, and you are done. Your symfony project is now accessible by requesting the web/index.php script from a browser.
Having all the symfony files under the web root directory is fine for testing symfony on your local computer, but is a really bad idea for a production server as it potentially makes all the internals of your application visible to end users.
You can now finish your installation by reading the Web Server Configuration section.
As a sandbox is just a normal symfony project where some tasks have been executed for you and some configuration changed, it is quite easy to use it as a starting point for a new project. However, keep in mind that you will probably need to adapt the configuration; for instance changing the security related settings (see the configuration of XSS and CSRF in this chapter).
Summary
To test and play with symfony on your local server, your best option for installation is definitely the sandbox, which contains a preconfigured symfony environment.
For a real development or on a production server, opt for the archive installation or the SVN checkout. This will install the symfony libraries, and you still need to initialize a project and an application. The last step of the application setup is the server configuration, which can be done in many ways. Symfony works perfectly fine with a virtual host, and it is the recommended solution.
If you have any problems during installation, you will find many tutorials and answers to frequently asked questions on the symfony website. If necessary, you can submit your problem to the symfony community, and you will get a quick and effective answer.
Once your project is initialized, it is a good habit to start a version-control process.
Now that you are ready to use symfony, it is time to see how to build a basic web application.
インデックス
Document Index
関連ページリスト
Related Pages
 Chapter 1 - Introducing Symfony
- Chapter 2 - Exploring Symfony's Code
- Chapter 3 - Running Symfony
- Chapter 4 - The Basics Of Page Creation
- Chapter 5 - Configuring Symfony
- Chapter 6 - Inside The Controller Layer
- Chapter 7 - Inside The View Layer
- Chapter 8 - Inside The Model Layer (Doctrine)
- Chapter 9 - Links And The Routing System
- Chapter 10 - Forms
- Chapter 11 - Emails
- Chapter 12 - Caching
- Chapter 13 - I18n And L10n
- Chapter 14 - Admin Generator
- Chapter 15 - Unit And Functional Testing
- Chapter 16 - Application Management Tools
- Chapter 17 - Extending Symfony
- Chapter 18 - Performance
- Chapter 19 - Mastering Symfony's Configuration Files
- Appendix B - GNU Free Documentation License

日本語ドキュメント
Japanese Documents
- 2011/01/18 Chapter 17 - Extending Symfony
- 2011/01/18 The generator.yml Configuration File
- 2011/01/18 Les tâches
- 2011/01/18 Emails
- 2010/11/26 blogチュートリアル(8) ビューの作成