Chapter 10 - Forms
Dealing with the display of form inputs, the validation of a form submission, and all the particular cases of forms is one of the most complex tasks in web development. Luckily, symfony provides a simple interface to a very powerful form sub-framework, and helps you to design and handle forms of any level of complexity in just a few lines of code.
Displaying a Form
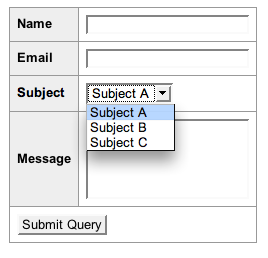
A simple contact form featuring a name, an email, a subject and a message fields typically renders as follows:
In symfony, a form is an object defined in the action and passed to the template. In order to display a form, you must first define the fields it contains - symfony uses the term "widget". The simplest way to do it is to create a new sfForm object in the action method.
// in modules/foo/actions/actions.class.php
public function executeContact($request)
{
  $this->form = new sfForm();
  $this->form->setWidgets(array(
    'name'    => new sfWidgetFormInputText(),
    'email'   => new sfWidgetFormInputText(array('default' => '[email protected]')),
    'subject' => new sfWidgetFormChoice(array('choices' => array('Subject A', 'Subject B', 'Subject C'))),
    'message' => new sfWidgetFormTextarea(),
  ));
}
sfForm::setWidgets() expects an associative array of widget name / widget object. sfWidgetFormInputText, sfWidgetFormChoice, and sfWidgetFormTextarea are some of the numerous widget classes offered by symfony; you will find a complete list further in this chapter.
The previous example shows two widget options you can use: default sets the widget value, and is available for all widgets. choices is an option specific to the choice widget (which renders as a drop-down list): it defines the available options the user can select.
So the foo/contact action defines a form object, and then handles it to the contactSuccess template in a $form variable. The template can use this object to render the various parts of the form in HTML. The simplest way to do it is to call echo $form, and this will render all the fields as form controls with labels. You can also use the form object to generate the form tag:
// in modules/foo/templates/contactSuccess.php
<?php echo $form->renderFormTag('foo/contact') ?>
  <table>
    <?php echo $form ?>
    <tr>
      <td colspan="2">
        <input type="submit" />
      </td>
    </tr>
  </table>
</form>
With the parameters passed to setWidgets(), symfony has enough information to display the form correctly. The resulting HTML renders exactly like the screenshot above, with this underlying code:
<form action="/frontend_dev.php/foo/contact" method="POST">
  <table>
    <tr>
      <th><label for="name">Name</label></th>
      <td><input type="text" name="name" id="name" /></td>
    </tr>
    <tr>
      <th><label for="email">Email</label></th>
      <td><input type="text" name="email" id="email" value="[email protected]" /></td>
    </tr>
    <tr>
      <th><label for="subject">Subject</label></th>
      <td>
        <select name="subject" id="subject">
          <option value="0">Subject A</option>
          <option value="1">Subject B</option>
          <option value="2">Subject C</option>
        </select>
      </td>
    </tr>
    <tr>
      <th><label for="message">Message</label></th>
      <td><textarea rows="4" cols="30" name="message" id="message"></textarea></td>
    </tr>
    <tr>
      <td colspan="2">
        <input type="submit" />
      </td>
    </tr>
  </table>
</form>
Each widget results in a table row containing a <label> tag, and a form input tag. Symfony deduces the label name from the widget name by uppercasing it (the subject widget name gives the 'Subject' label). As for the input tag, it depends on the widget type. Symfony adds an id attribute to each widget, based on its name. Lastly, the rendering of the form is always XHTML-compliant.
Customizing the Form Display
Using echo $form is great for prototyping, but you probably want to control exactly the resulting HTML code. The form object contains an array of fields, and calling echo $form actually iterates over the fields and renders them one by one. To get more control, you can iterate over the fields manually, and call the renderRow() on each field. The following listing produces exactly the same HTML code as previously, but the template echoes each field individually:
// in modules/foo/templates/contactSuccess.php
<?php echo $form->renderFormTag('foo/contact') ?>
  <table>
    <?php echo $form['name']->renderRow() ?>
    <?php echo $form['email']->renderRow() ?>
    <?php echo $form['subject']->renderRow() ?>
    <?php echo $form['message']->renderRow() ?>
    <tr>
      <td colspan="2">
        <input type="submit" />
      </td>
    </tr>
  </table>
</form>
Rendering fields one by one allows you to change the order in which they are displayed, and also to customize their appearance. renderRow() expects a list of HTML attributes as first argument, so you can define a custom class, id, or JavaScript event handler for instance. The second argument of renderRow() is an optional label that overrides the one deduced from the widget name. Here is an example of customization for the contact form:
// in modules/foo/templates/contactSuccess.php
<?php echo $form->renderFormTag('foo/contact') ?>
  <table>
    <?php echo $form['name']->renderRow(array('size' => 25, 'class' => 'foo'), 'Your Name') ?>
    <?php echo $form['email']->renderRow(array('onclick' => 'this.value = "";'), 'Your Email') ?>
    <?php echo $form['message']->renderRow() ?>
    <tr>
      <td colspan="2">
        <input type="submit" />
      </td>
    </tr>
  </table>
</form>
But maybe you need to output the label and the input of each field in <li> tags rather than in a <tr> tags. A field "row" is made of a label, an optional error message (added by the validation system, explained later in this chapter), a help text, and a widget (note that the widget can consist of more than one form control). Just as you can output the various fields of a form one by one, you can also render the various parts of a form independently. Instead of using renderRow(), use any of render() (for the widget), renderError(), renderLabel(), and renderHelp(). For instance, if you want to render the whole form with <li> tags, write the template as follows:
// in modules/foo/templates/contactSuccess.php
<?php echo $form->renderFormTag('foo/contact') ?>
  <ul>
    <?php foreach ($form as $field): ?>
    <li>
      <?php echo $field->renderLabel() ?>
      <?php echo $field->render() ?>
    </li>
    <?php endforeach; ?>
    <li>
      <input type="submit" />
    </li>
  </ul>
</form>
This renders to HTML as follows:
<form action="/frontend_dev.php/foo/contact" method="POST">
  <ul>
    <li>
      <label for="name">Name</label>
      <input type="text" name="name" id="name" />
    </li>
    <li>
      <label for="email">Email</label>
      <input type="text" name="email" id="email" />
    </li>
    <li>
      <label for="subject">Subject</label>
      <select name="subject" id="subject">
        <option value="0">Subject A</option>
        <option value="1">Subject B</option>
        <option value="2">Subject C</option>
      </select>
    </li>
    <li>
      <label for="message">Message</label>
      <textarea rows="4" cols="30" name="message" id="message"></textarea>
    </li>
    <li>
      <input type="submit" />
    </li>
  </ul>
</form>
A field row is the representation of all the elements of a form field (label, error message, help text, form input) by a formatter. By default, symfony uses a
tableformatter, and that's whyrenderRow()returns a set of<tr>,<th>and<td>tags. Alternatively, you can obtain the same HTML code as above by simply specifying an alternativelistformatter for the form, as follows:
// in modules/foo/templates/contactSuccess.php
<?php echo $form->renderFormTag('foo/contact') ?>
  <ul>
    <?php echo $form->renderUsing('list') ?>
    <li>
      <input type="submit" />
    </li>
  </ul>
</form>
Check the API documentation of the
sfWidgetFormSchemaFormatterclass to learn how to create your own formatter.
Form Widgets
There are many available form widgets at your disposal to compose your forms. All widgets accept at least the default option.
You can also define the label of a widget, and even its HTML attributes, when you create the form:
$this->form = new sfForm();
$this->form->setWidgets(array(
  'name'    => new sfWidgetFormInput(array('label' => 'Your Name'), array('size' => 25, 'class' => 'foo')),
  'email'   => new sfWidgetFormInput(array('default' => '[email protected]', 'label' => 'Your Email'), array('onclick' => 'this.value = "";')),
  'subject' => new sfWidgetFormChoice(array('choices' => array('Subject A', 'Subject B', 'Subject C'))),
  'message' => new sfWidgetFormTextarea(array(), array('rows' => '20', 'cols' => 5)),
));
Symfony uses these parameters to display the widget, and you can still override them by passing custom parameters to renderRow() in the template.
As an alternative to calling
setWidgets()with an associative array, you can call thesetWidget($name, $widget)method several times.
Standard Widgets
Here is a list of available widget types, and how they translate into HTML (via renderRow()):
// Text input
$form->setWidget('full_name', new sfWidgetFormInput(array('default' => 'John Doe')));
  <label for="full_name">Full Name</label>
  <input type="text" name="full_name" id="full_name" value="John Doe" />

// Textarea
$form->setWidget('address', new sfWidgetFormTextarea(array('default' => 'Enter your address here'), array('cols' => 20, 'rows' => 5)));
  <label for="address">Address</label>
  <textarea name="address" id="address" cols="20" rows="5">Enter your address here</textarea>

// Password input
// Note that 'password' type widgets don't take a 'default' parameter for security reasons
$form->setWidget('pwd', new sfWidgetFormInputPassword());
  <label for="pwd">Pwd</label>
  <input type="password" name="pwd" id="pwd" />

// Hidden input
$form->setWidget('id', new sfWidgetFormInputHidden(array('default' => 1234)));
  <input type="hidden" name="id" id="id" value="1234" />

// Checkbox
$form->setWidget('single', new sfWidgetFormInputCheckbox(array('value_attribute_value' => 'single', 'default' => true)));
  <label for="single">Single</label>
  <input type="checkbox" name="single" id="single" value="true" checked="checked" />
There are more options available for each widget than what is exposed here. Check the widget API documentation for a complete description of what each widget expects and how it renders.
List Widgets
Whenever users have to make a choice in a list of values, and whether they can select one or many option in this list, a single widget answers all the needs: the choice widget. According to two optional parameters (multiple and expanded), this widget renders in a different way:
                  | multiple=false       | multiple=true
                  | (default)            |
  ----------------|----------------------|---------------------
  expanded=false  |    Dropdown list     |    Dropdown box
  (default)       |    (`<select>`)      | (`<select multiple>`)
  ----------------|----------------------|----------------------
  expanded=true   | List of Radiobuttons | List of checkboxes
                  |                      |
The choice widget expects at least a choices parameter with an associative array to define both the value and the text of each option. Here is an example of each syntax:
// Dropdown list (select)
$form->setWidget('country', new sfWidgetFormChoice(array(
  'choices'   => array('' => 'Select from the list', 'us' => 'USA', 'ca' => 'Canada', 'uk' => 'UK', 'other'),
  'default'   => 'uk'
)));
// symfony renders the widget in HTML as
<label for="country">Country</label>
<select id="country" name="country">
  <option value="">Select from the list</option>
  <option value="us">USA</option>
  <option value="ca">Canada</option>
  <option value="uk" selected="selected">UK</option>
  <option value="0">other</option>
</select>

// Dropdown list with multiple choices
$form->setWidget('languages', new sfWidgetFormChoice(array(
  'multiple' => 'true',
  'choices'  => array('en' => 'English', 'fr' => 'French', 'other'),
  'default'  => array('en', 0)
)));
// symfony renders the widget in HTML as
<label for="languages">Language</label>
<select id="languages" multiple="multiple" name="languages[]">
  <option value="en" selected="selected">English</option>
  <option value="fr">French</option>
  <option value="0" selected="selected">other</option>
</select>

// List of Radio buttons
$form->setWidget('gender', new sfWidgetFormChoice(array(
  'expanded' => true,
  'choices'  => array('m' => 'Male', 'f' => 'Female'),
  'class'    => 'gender_list'
)));
// symfony renders the widget in HTML as
<label for="gender">Gender</label>
<ul class="gender_list">
  <li><input type="radio" name="gender" id="gender_m" value="m"><label for="gender_m">Male</label></li>
  <li><input type="radio" name="gender" id="gender_f" value="f"><label for="gender_f">Female</label></li>
</ul>

// List of checkboxes
$form->setWidget('interests', new sfWidgetFormChoice(array(
  'multiple' => 'true',
  'expanded' => true,
  'choices' => array('Programming', 'Other')
)));
// symfony renders the widget in HTML as
<label for="interests">Interests</label>
<ul class="interests_list">
  <li><input type="checkbox" name="interests[]" id="interests_0" value="0"><label for="interests_0">Programming</label></li>
  <li><input type="checkbox" name="interests[]" id="interests_1" value="1"><label for="interests_1">Other</label></li>
</ul>
You probably noticed that symfony automatically defines an
idattribute for each form input, based on a combination of the name and value of the widget. You can override theidattribute widget by widget, or alternatively set a global rule for the whole form with thesetIdFormat()method of thesfWidgetFormclass:
// in modules/foo/actions/actions.class.php
$this->form = new sfForm();
$this->form->getWidgetSchema()->setIdFormat('my_form_%s');
Foreign Key Widgets
When editing Model objects through a form, a particular list of choices always comes up: the list of objects that can be related to the current one. This happens when models are related by a many-to-one relationship, or a many-to-many. Fortunately, the sfPropelPlugin bundled with symfony provides a sfWidgetFormPropelChoice widget specifically for these cases (and sfDoctrinePlugin offers a similar sfWidgetFormDoctrineChoice widget).
For instance, if a Section has many Articles, you should be able to choose a section among the list of existing ones when editing an article. To do so, an ArticleForm should use the sfWidgetFormPropelChoice widget:
$articleForm = new sfForm();
$articleForm->setWidgets(array(
  'id'        => sfWidgetFormInputHidden(),
  'title'     => sfWidgetFormInputText(),
  'section_id' => sfWidgetFormPropelChoice(array(
    'model'  => 'Section',
    'column' => 'name'
  )
)));
This will display a list of existing sections... provided you defined a __toString() method in the Section model class. That's because symfony first retrieves the available Section objects, and populates a choice widget with them by trying to echo each object. So the Section model should at least feature the following method:
// in lib/model/Section.php
public function __toString()
{
  return $this->getName();
}
The sfWidgetFormPropelChoice widget is an extension of the sfWidgetFormChoice widget, so you can use the multiple option to deal with many-to-many relationships, and the expanded option to change the way the widget is rendered.
If you want to order the list of choices in a special way, or filter it so that is displays only a portion of the available choices, use the criteria option to pass a Criteria object to the widget. Doctrine supports the same kind of customization: you can pass a Doctrine_Query object to the widget with the query option.
Date Widgets
Date and time widgets output a set of drop-down lists, populated with the available values for the day, month, year, hour or minute.
// Date
$years = range(1950, 1990);
$form->setWidget('dob', new sfWidgetFormDate(array(
  'label'   => 'Date of birth',
  'default' => '01/01/1950',  // can be a timestamp or a string understandable by strtotime()
  'years'   => array_combine($years, $years)
)));
// symfony renders the widget in HTML as
<label for="dob">Date of birth</label>
<select id="dob_month" name="dob[month]">
  <option value=""/>
  <option selected="selected" value="1">01</option>
  <option value="2">02</option>
  ...
  <option value="12">12</option>
</select> /
<select id="dob_day" name="dob[day]">
  <option value=""/>
  <option selected="selected" value="1">01</option>
  <option value="2">02</option>
  ...
  <option value="31">31</option>
</select> /
<select id="dob_year" name="dob[year]">
  <option value=""/>
  <option selected="selected" value="1950">1950</option>
  <option value="1951">1951</option>
  ...
  <option value="1990">1990</option>
</select>

// Time
$form->setWidget('start', new sfWidgetFormTime(array('default' => '12:00')));
// symfony renders the widget in HTML as
<label for="start">Start</label>
<select id="start_hour" name="start[hour]">
  <option value=""/>
  <option value="0">00</option>
  ...
  <option selected="selected" value="12">12</option>
  ...
  <option value="23">23</option>
</select> :
<select id="start_minute" name="start[minute]">
  <option value=""/>
  <option selected="selected" value="0">00</option>
  <option value="1">01</option>
  ...
  <option value="59">59</option>
</select>

// Date and time
$form->setWidget('end', new sfWidgetFormDateTime(array('default' => '01/01/2008 12:00')));
// symfony renders the widget in HTML as 5 dropdown lists for month, day, year, hour, minute
Of course, you can customize the date format, to display it in European style instead of International style (%day%/%month%/%year% instead of %month%/%day%/%year%), you can switch to 2x12 hours per day instead of 24 hours, you can define custom values for the first option of each dropdown box, and you can define limits to the possible values. Once again, check the API documentation for more details about the options of the date and time widgets.
Date widgets are a good example of the power of widgets in symfony. A widget is not a simple form input. It can be a combination of several inputs, that symfony can render and read from in a transparent way.
I18n Widgets
In multilingual applications, dates must be displayed in a format according to the user culture (see Chapter 13 for details about culture and localization). To facilitate this localization in forms, symfony provides an sfWidgetFormI18nDate widget, which expects a user culture to decide of the date formatting parameters. You can also specify a month_format to have the month drop-down display month names (in the user language) instead of numbers.
// Date
$years = range(1950, 1990);
$form->setWidget('dob', new sfWidgetFormI18nDate(array(
  'culture'      => $this->getUser()->getCulture(),
  'month_format' => 'name',   // Use any of 'name' (default), 'short_name', and 'number'
  'label'        => 'Date of birth',
  'default'      => '01/01/1950',
  'years'        => array_combine($years, $years)
)));
// For an English-speaking user, symfony renders the widget in HTML as
<label for="dob">Date of birth</label>
<select id="dob_month" name="dob[month]">
  <option value=""/>
  <option selected="selected" value="1">January</option>
  <option value="2">February</option>
  ...
  <option value="12">December</option>
</select> /
<select id="dob_day" name="dob[day]">...</select> /
<select id="dob_year" name="dob[year]">...</select>
// For an French-speaking user, symfony renders the widget in HTML as
<label for="dob">Date of birth</label>
<select id="dob_day" name="dob[day]">...</select> /
<select id="dob_month" name="dob[month]">
  <option value=""/>
  <option selected="selected" value="1">Janvier</option>
  <option value="2">Février</option>
  ...
  <option value="12">Décembre</option>
</select> /
<select id="dob_year" name="dob[year]">...</select>
Similar widgets exist for time (sfWidgetFormI18nTime), and datetime (sfWidgetFormI18nDateTime).
There are two drop-down lists that occur in many forms and that also rely on the user culture: country and language selectors. Symfony provides two widgets especially for this purpose. You don't need to define the choices in these widgets, as symfony will populate them with the list of countries and languages in the language of the user (provided the user speaks any of the 250 referenced languages in symfony).
// Country list
$form->setWidget('country', new sfWidgetFormI18nCountryChoice(array('default' => 'UK')));
// For an English-speaking user, symfony renders the widget in HTML as
<label for="country">Country</label>
<select id="country" name="country">
  <option value=""/>
  <option value="AD">Andorra</option>
  <option value="AE">United Arab Emirates</option>
  ...
  <option value="ZWD">Zimbabwe</option>
</select>

// Language list
$form->setWidget('language', new sfWidgetFormI18nLanguageChoice(array(
  'languages' => array('en', 'fr', 'de'),  // optional restricted list of languages
  'default'   => 'en'
)));
// For an English-speaking user, symfony renders the widget in HTML as
<label for="language">Language</label>
<select id="language" name="language">
  <option value=""/>
  <option value="de">German</option>
  <option value="en" selected="selected">English</option>
  <option value="fr">French</option>
</select>
File Widgets
Dealing with file input tags is not more complicated than dealing with other widgets:
// Input file
$form->setWidget('picture', new sfWidgetFormInputFile());
// symfony renders the widget in HTML as
<label for="picture">Picture</label>
<input id="picture" type="file" name="picture"/>
// Whenever a form has a file widget, renderFormTag() outputs a <form> tag with the multipart option

// Editable input file
$form->setWidget('picture', new sfWidgetFormInputFileEditable(array('default' => '/images/foo.png')));
// symfony renders the widget in HTML as a file input tag, together with a preview of the current file
Third-party plugins provide many additional widgets. You can easily find a rich text editor widget, a calendar widget, or other "rich UI" widgets for various JavaScript libraries. Check the Plugins repository for more details.
Handling a Form Submission
When users fill a form and submit it, the web application server needs to retrieve the data from the request and do some stuff with it. The sfForm class provides all the necessary methods to do that in a couple lines of code.
Simple Form Handling
Since widgets output as regular HTML form fields, getting their value in the action that handles the form submission is as easy as checking the related request parameters. For the example contact form, the action could look like this:
// in modules/foo/actions/actions.class.php
public function executeContact($request)
{
  // Define the form
  $this->form = new sfForm();
  $this->form->setWidgets(array(
    'name'    => new sfWidgetFormInputText(),
    'email'   => new sfWidgetFormInput(array('default' => '[email protected]')),
    'subject' => new sfWidgetFormChoice(array('choices' => array('Subject A', 'Subject B', 'Subject C'))),
    'message' => new sfWidgetFormTextarea(),
  ));

  // Deal with the request
  if ($request->isMethod('post'))
  {
    // Handle the form submission
    $name = $request->getParameter('name');
    // Do stuff
    // ...
    $this->redirect('foo/bar');
  }
}
If the request method is 'GET', this action will terminate over a sfView::SUCCESS and therefore render the contactSuccess template to display the form. If the request method is 'POST', then the action handles the form submission and redirects to another action. For this to work, the <form> target action must be the same as the one displaying it. That explains why the previous examples used foo/contact as a form target:
// in modules/foo/templates/contactSuccess.php
<?php echo $form->renderFormTag('foo/contact') ?>
...
Form Handling With Data Validation
In practice, there is much more to form submission handling than just getting the values entered by the user. For most form submissions, the application controller needs to:
- Check that the data is conform to a set of predefined rules (required fields, format of the email, etc.)
- Optionally transform some of the input data to make it understandable (trim whitespaces, convert dates to PHP format, etc)
- If the data is not valid, display the form again, with error messages where applicable
- If the data is correct, do some stuff and then redirect to another action
Symfony provides an automatic way to validate the submitted data against a set of predefined rules. First, define a set of validators for each field. Second, when the form is submitted, "bind" the form object with the user submitted values (i.e., retrieve the values submitted by the user and put them in the form). Lastly, ask the form to check that the data is valid. The following example shows how to check that the value retrieved from the email widget is, indeed, an email address, and to check that the message has a minimum size of 4 characters:
// in modules/foo/actions/actions.class.php
public function executeContact($request)
{
  // Define the form
  $this->form = new sfForm();
  $this->form->setWidgets(array(
    'name'    => new sfWidgetFormInputText(),
    'email'   => new sfWidgetFormInput(array('default' => '[email protected]')),
    'subject' => new sfWidgetFormChoice(array('choices' => array('Subject A', 'Subject B', 'Subject C'))),
    'message' => new sfWidgetFormTextarea(),
  ));
  $this->form->setValidators(array(
    'name'    => new sfValidatorString(),
    'email'   => new sfValidatorEmail(),
    'subject' => new sfValidatorString(),
    'message' => new sfValidatorString(array('min_length' => 4))
  ));

  // Deal with the request
  if ($request->isMethod('post'))
  {
    $this->form->bind(/* user submitted data */);
    if ($this->form->isValid())
    {
      // Handle the form submission
      // ...

      $this->redirect('foo/bar');
    }
  }
}
setValidators() uses a similar syntax to the setWidgets() method. sfValidatorEmail and sfValidatorString are two of the numerous symfony validator classes, listed further in this chapter. Naturally, sfForm also provide a setValidator() method to add validators one by one.
To put the request data into the form and bind them together, use the sfForm::bind() method. A form must be bound with some data to check its validity.
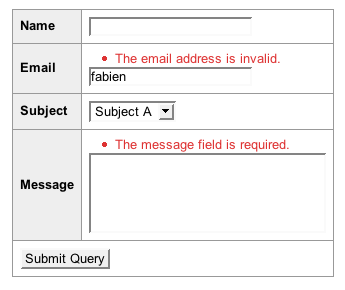
isValid() checks that all the registered validators pass. If this is the case, isValid() returns true, and the action can proceed with the form submission. If the form is not valid, then the action terminates with the default sfView::SUCCESS and displays the form again. But the form isn't just displayed with the default values, as the first time it was displayed. The form inputs show up filled with the data previously entered by the user, and error messages appear wherever the validators didn't pass.
The validation process doesn't stop when the form meets an invalid field.
isValid()processes the whole form data and checks all the fields for errors, to avoid displaying new error messages as the user corrects its mistakes and submits the form again.
Using Clean Form Data
In the previous listing, we haven't defined the request data received by the form during the binding process. The problem is that the request contains more than just the form data. It also contains headers, cookies, parameters passed as GET arguments, and all this might pollute the binding process. A good practice is to pass only the form data to the bind() method.
Fortunately, symfony offers a way to name all form inputs using an array syntax. Define the name attribute format width the setNameFormat() method in the action when you define the form, as follows:
// in modules/foo/actions/actions.class.php
// Define the form
$this->form->getWidgetSchema()->setNameFormat('contact[%s]');
That way, all the generated form inputs render with a name like form[WIDGET_NAME] instead of just WIDGET_NAME:
<label for="contact_name">Name</label>
<input type="text" name="contact[name]" id="contact_name" />
...
<label for="contact_email">Email</label>
<input type="text" name="contact[email]" id="contact_email" value="[email protected]" />
...
<label for="contact_subject">Subject</label>
<select name="contact[subject]" id="contact_subject">
  <option value="0">Subject A</option>
  <option value="1">Subject B</option>
  <option value="2">Subject C</option>
</select>
...
<label for="contact_message">Message</label>
<textarea rows="4" cols="30" name="contact[message]" id="contact_message"></textarea>
The action can now retrieve the contact request parameter into a single variable. This variable contains an array of all the data entered by the user in the form:
// in modules/foo/actions/actions.class.php
// Deal with the request
if ($request->isMethod('post'))
{
  $this->form->bind($request->getParameter('contact'));
  if ($this->form->isValid())
  {
    // Handle the form submission
    $contact = $this->form->getValues();
    $name = $contact['name'];

    // Or to get a specific value
    $name = $this->form->getValue('name');

    // Do stuff
    // ...
    $this->redirect('foo/bar');
  }
}
When the bind() method receives an array of parameters, symfony automatically avoid injection of additional fields on the client side. This security feature will make the form validation fail if the array of contact parameters contains a field that is not in the original form definition.
You will notice one more difference in the action code above with the one written previously. The action uses the array of values passed by the form object ($form->getValues()) rather than the one from the request. This is because the validators have the ability to filter the input and clean it, so it's always better to rely on the data retrieved from the form object (by way of getValues() or getValue()) than the data from the request. And for composite fields (like date widgets), the data returned by getValues() is already recomposed into the original names:
// When submitted, the form controls of a 'date' widget...
<label for="contact_dob">Date of birth</label>
<select id="contact_dob_month" name="contact[dob][month]">...</select> /
<select id="contact_dob_day" name="contact[dob][day]">...</select> /
<select id="contact_dob_year" name="contact[dob][year]">...</select>
// ...result in three request parameters in the action
$contact = $request->getParameter('contact');
$month = $contact['dob']['month'];
$day = $contact['dob']['day'];
$year = $contact['dob']['year'];
$dateOfBirth = mktime(0, 0, 0, $month, $day, $year);
// But if you use getValues(), you can retrieve directly a correct date
$contact = $this->form->getValues();
$dateOfBirth = $contact['dob'];
So take the habit to always use an array syntax for your form fields (using setNameFormat()) and to always use the clean form output (using getValues()).
Customizing Error Messages Display
Where do the error messages shown in the screenshot above come from? You know that a widget is made of four components, and the error message is one of them. In fact, the default (table) formatter renders a field row as follows:
<?php if ($field->hasError()): ?>
<tr>
  <td colspan="2">
    <?php echo $field->renderError() ?>           // List of errors
  </td>
</tr>
<?php endif; ?>
<tr>
  <th><?php echo $field->renderLabel() ?></th>    // Label
  <td>
    <?php echo $field->render() ?>                // Widget
    <?php if ($field->hasHelp()): ?>
    <br /><?php echo $field->renderHelp() ?>      // Help
    <?php endif; ?>
  </td>
</tr>
Using any of the methods above, you can customize where and how the error messages appear for each field. In addition, you can display a global error message on top of the form is if is not valid:
<?php if ($form->hasErrors()): ?>
  The form has some errors you need to fix.
<?php endif; ?>
Customizing Validators
In a form, all fields must have a validator and by default, all the fields are required. If you need to set a field optional, pass the required option to the validator and set it to false. For instance, the following listing shows how to make the name field required and the email field optional:
$this->form->setValidators(array(
  'name'    => new sfValidatorString(),
  'email'   => new sfValidatorEmail(array('required' => false)),
  'subject' => new sfValidatorString(),
  'message' => new sfValidatorString(array('min_length' => 4))
));
You can apply more than one validator on a field. For instance, you may want to check that the email field satisfies both the sfValidatorEmail and the sfValidatorString validators with a minimum size of 4 characters. In such a case, use the sfValidatorAnd validator to combine two validators, and pass the two sfValidatorEmail and sfValidatorString validators as an argument:
$this->form->setValidators(array(
  'name'    => new sfValidatorString(),
  'email'   => new sfValidatorAnd(array(
    new sfValidatorEmail(),
    new sfValidatorString(array('min_length' => 4)),
  ), array('required' => false)),
  'subject' => new sfValidatorString(),
  'message' => new sfValidatorString(array('min_length' => 4))
));
If both validators are valid, then the email field is declared valid. Similarly, you can use the sfValidatorOr validator to combine several validators. If one of the validators is valid, then the field is declared valid.
Each invalid validator results into an error message in the field. These error messages are in English but use the symfony internationalization helpers; if your project uses other languages, you can easily translate the error messages with an i18n dictionary. Alternatively, every validator provides a third argument to customize its error messages. Each validator has at least two error messages: the required message and the invalid message. Some validators can display error messages for a different purpose, and will always support the overriding of the error messages through their third argument:
// in modules/foo/actions/actions.class.php
$this->form->setValidators(array(
  'name'    => new sfValidatorString(),
  'email'   => new sfValidatorEmail(array(), array(
    'required'   => 'Please provide an email',
    'invalid'    => 'Please provide a valid email address ([email protected])'
  )),
  'subject' => new sfValidatorString(),
  'message' => new sfValidatorString(array('min_length' => 4), array(
    'required'   => 'Please provide a message',
    'min_length' => 'Please provide a longer message (at least 4 characters)'
  ))
));
Naturally, these custom messages will render in the templates through i18n helpers, so any multilingual application can also translate custom error messages in a dictionary (see Chapter 13 for details).
Applying a Validator To Several Fields
The syntax used above to define validators on a form does not allow to validate that two fields are valid together. For instance, in a registration form, there are often two password fields that must match, otherwise the registration is refused. Each password field is not valid on its own, it is only valid when associated with the other field.
That's why you can set a 'multiple' validator via setPostValidator() to set the validators that work on several values. The post validator is executed after all other validators and receives an array of cleaned up values. If you need to validate raw input form data, use the setPreValidator() method instead.
A typical registration form definition would look like this:
// in modules/foo/actions/actions.class.php
// Define the form
$this->form = new sfForm();
$this->form->setWidgets(array(
  'login'     => new sfWidgetFormInputText(),
  'password1' => new sfWidgetFormInputText(),
  'password2' => new sfWidgetFormInputText()
);
$this->form->setValidators(array(
  'login'     => new sfValidatorString(), // login is required
  'password1' => new sfValidatorString(), // password1 is required
  'password2' => new sfValidatorString(), // password2 is required
));
$this->form->setPostValidators(new sfValidatorSchemaCompare('password1', '==', 'password2'));
The sfValidatorSchemaCompare validator is a special multiple validator that receives all the cleaned up values and can pick up two of them for comparison. Naturally, you can define more than one post validator by using the sfValidatorAnd and the sfValidatorOr validators.
Validators
Symfony offers quite a lot of validators. Remember that each validator accepts an array of option and an array of errors as arguments where you can at least customize the required and invalid error messages.
// String validator
$form->setValidator('message', new sfValidatorString(array(
  'min_length' => 4,
  'max_length' => 50,
),
array(
  'min_length' => 'Please post a longer message',
  'max_length' => 'Please be less verbose',
)));

// Number validator
$form->setValidator('age', new sfValidatorNumber(array( // use 'sfValidatorInteger' instead if you want to force integer values
  'min'  => 18,
  'max'  => 99.99,
),
array(
  'min' => 'You must be 18 or more to use this service',
  'max' => 'Are you kidding me? People over 30 can\'t even use the Internet',
)));

// Email validator
$form->setValidator('email', new sfValidatorEmail());

// URL validator
$form->setValidator('website', new sfValidatorUrl());

// Regular expression validator
$form->setValidator('IP', new sfValidatorRegex(array(
  'pattern' => '^[0-9]{3}\.[0-9]{3}\.[0-9]{2}\.[0-9]{3}$'
)));
Even though some form controls (like drop-down lists, checkboxes, radio button groups) restrict the possible choices, a malicious user can always try to hack your forms by manipulating the page with Firebug or submitting a query with a scripting language. Consequently, you should also validate fields that only accept a limited array of values:
// Boolean validator
$form->setValidator('has_signed_terms_of_service', new sfValidatorBoolean());

// Choice validator (to restrict values in a list)
$form->setValidator('subject', new sfValidatorChoice(array(
  'choices' => array('Subject A', 'Subject B', 'Subject C')
)));

// Multiple choice validator
$form->setValidator('languages', new sfValidatorChoice(array(
  'multiple' => true,
  'choices' => array('en' => 'English', 'fr' => 'French', 'other')
)));
I18n choice validators exist for country lists (sfValidatorI18nChoiceCountry) and language lists (sfValidatorI18nChoiceLanguage). These validators accept a restricted list of countries and languages if you want to limit the possible options.
The sfValidatorChoice validator is often used to validate a sfWidgetFormChoice widget. And since you can use the sfWidgetFormChoice widget for foreign key columns, so symfony also provides a validator to check that the foreign key value exists in the foreign table:
// Propel choice validator
$form->setValidator('section_id', new sfValidatorPropelChoice(array(
  'model'  => 'Section',
  'column' => 'name'
)));

// Doctrine choice validator
$form->setValidator('section_id', new sfValidatorDoctrineChoice(array(
  'model'  => 'Section',
  'column' => 'name'
)));
Another useful Model-related validator is the sfValidatorPropelUnique validator, which checks that a new value entered via a form doesn't conflict with an existing value in a database column with a unique index. For instance, two users cannot have the same login, so when editing a User object with a form, you must add a sfValidatorPropelUnique validator on this column:
// Propel unique validator
$form->setValidator('nickname', new sfValidatorPropelUnique(array(
  'model'  => 'User',
  'column' => 'login'
)));

$form->setValidator('nickname', new sfValidatorDoctrineUnique(array(
  'model'  => 'User',
  'column' => 'login'
)));
To make your forms even more secure and avoid Cross-Site Request Forgery attacks, you can enable the CSRF protection:
// CSRF protection - set the secret to a random string that nobody knows
$form->addCSRFProtection('flkd445rvvrGV34G');
You can set the CSRF secret once for the whole site in the
settings.ymlfile:
---
# in apps/myapp/config/settings.yml
all:
  .settings:
    # Form security secret (CSRF protection)
    csrf_secret:
The multiple validators work with the whole form, rather than a single input. Here is a list of available multiple validators:
// compare validator - compare two fields
$form->setPostValidator(new sfValidatorSchemaCompare('password1', '==', 'password2'));

// Extra field validator: looks for fields in the request not present in the form
$form->setOption('allow_extra_fields', false);
$form->setOption('filter_extra_fields', true);
Alternative Ways to Use a Form
Form Classes
With all the widget options, validators and form parameters, the contact form definition written in the actions class looks quite messy:
// in modules/foo/actions/actions.class.php
// Define the form
$this->form = new sfForm();
$this->form->getWidgetSchema()->setNameFormat('contact[%s]');
$this->form->getWidgetSchema()->setIdFormat('my_form_%s');

$this->form->setWidgets(array(
  'name'    => new sfWidgetFormInputText(),
  'email'   => new sfWidgetFormInput(array('default' => '[email protected]')),
  'subject' => new sfWidgetFormChoice(array('choices' => array('Subject A', 'Subject B', 'Subject C'))),
  'message' => new sfWidgetFormTextarea(),
));
$this->form->setValidators(array(
  'name'    => new sfValidatorString(),
  'email'   => new sfValidatorEmail(),
  'subject' => new sfValidatorString(),
  'message' => new sfValidatorString(array('min_length' => 4))
));
The best practice is to create a form class with the same properties and instantiate it in all the actions using it. For instance, here is how you could create a class for the contact form:
// in lib/form/ContactForm.class.php
class ContactForm extends sfForm
{
  protected static $subjects = array('Subject A', 'Subject B', 'Subject C');

  public function configure()
  {
    $this->widgetSchema->setNameFormat('contact[%s]');
    $this->widgetSchema->setIdFormat('my_form_%s');
    $this->setWidgets(array(
      'name'    => new sfWidgetFormInputText(),
      'email'   => new sfWidgetFormInput(array('default' => '[email protected]')),
      'subject' => new sfWidgetFormChoice(array('choices' => array('Subject A', 'Subject B', 'Subject C'))),
      'message' => new sfWidgetFormTextarea(),
    ));
    $this->setValidators(array(
      'name'    => new sfValidatorString(),
      'email'   => new sfValidatorEmail(),
      'subject' => new sfValidatorString(),
      'message' => new sfValidatorString(array('min_length' => 4))
    ));
    $this->setDefaults(array(
      'email' => '[email protected]'
    ));
  }
}
Now getting a contact form object in the action has never been easier:
// in modules/foo/actions/actions.class.php
// Define the form
$this->form = new ContactForm();
Altering a Form Object
When you use a form class definition, the form is defined outside the action. That makes dynamic default value assignment quite difficult. That's why the form object takes an array of default values as its first argument:
// in modules/foo/actions/actions.class.php
// Define the form
$this->form = new ContactForm(array('email' => '[email protected]'));
You can also override existing widget or validator settings by calling setWidget() or setValidator() on an existing field name.
However, widgets and validators are objects in symfony, and offer a clean API to modify their properties:
// in modules/foo/actions/actions.class.php
// Define the form
$this->form = new ContactForm();

// Allow multiple language selections
$form->getWidget('language')->setOption('multiple', true);
// Add a 'gender' list of options widget
$form->setWidget('gender', new sfWidgetFormChoice(array('expanded' => true, 'choices' => array('m' => 'Male', 'f' => 'Female')), array('class' => 'gender_list')));
// Change the HTML attributes of the 'subject' widget
$form->getWidget('subject')->setAttribute('disabled', 'disabled');
// Remove the 'subject' field
unset($form['subject'])
// Note: You cannot remove just the widget. Removing a widget will also remove the related validators

// Change the 'min_length' error in the 'message' validator
$form->getValidator('message')->setMessage('min_length', 'Message too short');
// Make the 'name' field optional
$form->getValidator('name')->setOption('required', false);
Custom Widget and Validator classes
A custom widget is simply a class extending sfWidgetForm, and providing a configure() and a render() methods. Check the code of existing widget classes for a deeper understanding of the widgets system. The next listing exposes the code of the sfWidgetFormInput widget to illustrate the widget structure:
class sfWidgetFormInputText extends sfWidgetForm
{
  /**
   * Configures the current widget.
   * This method allows each widget to add options or HTML attributes during widget creation.
   * Available options:
   *  * type: The widget type (text by default)
   *
   * @param array $options     An array of options
   * @param array $attributes  An array of default HTML attributes
   * @see sfWidgetForm
   */
  protected function configure($options = array(), $attributes = array())
  {
    $this->addOption('type', 'text');
    $this->setOption('is_hidden', false);
  }

  /**
   * Renders the widget as HTML
   *
   * @param  string $name        The element name
   * @param  string $value       The value displayed in this widget
   * @param  array  $attributes  An array of HTML attributes to be merged with the default HTML attributes
   * @param  array  $errors      An array of errors for the field
   * @return string An HTML tag string
   * @see sfWidgetForm
   */
  public function render($name, $value = null, $attributes = array(), $errors = array())
  {
    return $this->renderTag('input', array_merge(
      array('type' => $this->getOption('type'), 'name' => $name, 'value' => $value),
      $attributes
    ));
  }
}
A validator class must extend sfValidatorBase and provide a configure() and a doClean() methods. Why doClean() and not validate()? Because validators do two things: they check that the input fulfills a set of rules, and they optionally clean the input (for instance by forcing the type, trimming, converting date strings to timestamp, etc.). So the doClean() method must return the cleaned input, or throw a sfValidatorError exception if the input doesn't satisfy any of the validator rules. Here is an illustration of this concept, with the code of the sfValidatorInteger validator.
class sfValidatorInteger extends sfValidatorBase
{
  /**
   * Configures the current validator.
   * This method allows each validator to add options and error messages during validator creation.
   * Available options:
   *  * max: The maximum value allowed
   *  * min: The minimum value allowed
   * Available error codes:
   *  * max
   *  * min
   *
   * @param array $options   An array of options
   * @param array $messages  An array of error messages
   * @see sfValidatorBase
   */
  protected function configure($options = array(), $messages = array())
  {
    $this->addOption('min');
    $this->addOption('max');
    $this->addMessage('max', '"%value%" must be less than %max%.');
    $this->addMessage('min', '"%value%" must be greater than %min%.');
    $this->setMessage('invalid', '"%value%" is not an integer.');
  }

  /**
   * Cleans the input value.
   *
   * @param  mixed $value  The input value
   * @return mixed The cleaned value
   * @throws sfValidatorError
   */
  protected function doClean($value)
  {
    $clean = intval($value);
    if (strval($clean) != $value)
    {
      throw new sfValidatorError($this, 'invalid', array('value' => $value));
    }
    if ($this->hasOption('max') && $clean > $this->getOption('max'))
    {
      throw new sfValidatorError($this, 'max', array('value' => $value, 'max' => $this->getOption('max')));
    }
    if ($this->hasOption('min') && $clean < $this->getOption('min'))
    {
      throw new sfValidatorError($this, 'min', array('value' => $value, 'min' => $this->getOption('min')));
    }

    return $clean;
  }
}
Check the symfony API documentation for widget and validator classes names and syntax.
Use options to pass parameters to the form class
A common issue with forms is to be able to use application parameters, such as the user's culture. The fastest but ugly way is to retrieve the user instance through the sfContext instance, using the
sfContext::getInstance()->getUser()method. However, this solution create a big coupling between the form and the context, making the testing and reusability more difficult. To avoid this problem, you can simply use option to pass theculturevalue to the form :// from an action public function executeContact(sfWebRequest $request) { $this->form = new ContactForm(array(), array('culture' => $this->getUser()->getCulture())); } // from a unit test $form = new ContactForm(array(), array('culture' => 'en')); class ContactForm extends sfForm { public function configure() { /* ... */ $this->setWidget('country', new sfWidgetFormI18NCountry(array('culture' => $this->getOption('culture')))); /* ... */ } }
Forms Based on a Model
Forms are the primary way to edit database records in web applications. And most forms in symfony applications allow the editing of a Model object. But the information necessary to build a form to edit a model already exists: it is in the schema. So symfony provides a form generator for model objects, that makes the creation of model-editing forms a snap.
Similar features to the ones described below exist for Doctrine.
Generating Model Forms
Symfony can deduce the widget types and the validators to use for a model editing form, based on the schema. Take the following schema, for instance with the Propel ORM:
/A form to edit an Article object should use a hidden widget for the id, a text widget for the title, a string validator for the title, etc. Symfony generates the form for you, provided that you call the propel:build-forms task:
// propel
$ php symfony propel:build-forms

// doctrine
$ php symfony doctrine:build-forms
For each table in the model, this command creates two files under the lib/form/ directory: a BaseXXXForm class, overridden each time you call the propel:build-forms task, and an empty XXXForm class, extending the previous one. It is the same system as the Propel model classes generation.
The generated lib/form/base/BaseArticleForm.class.php contains the translation into widgets and validators of the columns defined for the article table in the schema.yml:
class BaseArticleForm extends BaseFormPropel
{
  public function setup()
  {
    $this->setWidgets(array(
      'id'           => new sfWidgetFormInputHidden(),
      'title'        => new sfWidgetFormInputText(),
      'slug'         => new sfWidgetFormInputText(),
      'content'      => new sfWidgetFormTextarea(),
      'is_published' => new sfWidgetFormInputCheckbox(),
      'author_id'    => new sfWidgetFormPropelChoice(array('model' => 'Author', 'add_empty' => false)),
      'created_at'   => new sfWidgetFormDatetime(),
    ));
    $this->setValidators(array(
      'id'           => new sfValidatorPropelChoice(array('model' => 'Article', 'column' => 'id', 'required' => false)),
      'title'        => new sfValidatorString(array('max_length' => 255)),
      'slug'         => new sfValidatorString(array('max_length' => 255)),
      'content'      => new sfValidatorString(array('max_length' => 255, 'required' => false)),
      'is_published' => new sfValidatorBoolean(),
      'author_id'    => new sfValidatorPropelChoice(array('model' => 'Author', 'column' => 'id')),
      'created_at'   => new sfValidatorDatetime(array('required' => false)),
    ));
    $this->setPostValidator(
      new sfValidatorPropelUnique(array('model' => 'Article', 'column' => array('slug')))
    );
    $this->widgetSchema->setNameFormat('article[%s]');
    parent::setup();
  }

  public function getModelName()
  {
    return 'Article';
  }
}
Notice that even though the id column is an Integer, symfony checks that the submitted id exists in the table using a sfValidatorPropelChoice validator. The form generator always sets the strongest validation rules, to ensure the cleanest data in the database.
Using Model Forms
You can customize generated form classes for your entire project by adding code to the empty ArticleForm::configure() method.
Here is an example of model form handling in an action. In this form, the slug validator is modified to make it optional, and the author_id widget is customized to display only a subset of authors - the 'active' ones.
// in lib/form/ArticleForm.class.php
public function configure()
{
  $this->getWidget('author_id')->setOption('criteria', $this->getOption('criteria'));
  $this->getValidator('slug')->setOption('required', false);
}

// in modules/foo/actions/actions.class.php
public function executeEditArticle($request)
{
  $c = new Criteria();
  $c->add(AuthorPeer::ACTIVE, true);

  $this->form = new ArticleForm(
    ArticlePeer::retrieveByPk($request->getParameter('id')),
    array('criteria' => $c)
  );

  if ($request->isMethod('post'))
  {
    $this->form->bind($request->getParameter('article'));
    if ($this->form->isValid())
    {
      $article = $this->form->save();

      $this->redirect('article/edit?id='.$author->getId());
    }
  }
}
Instead of setting default values through an associative array, Model forms use a Model object to initialize the widget values. To display an empty form, just pass a new Model object.
The form submission handling is greatly simplified by the fact that the form object has an embedded Model object. Calling $this->form->save() on a valid form updates the embedded Article object with the cleaned values and triggers the save() method on the Article object, as well as on the related objects if they exist.
The action code required to deal with a form is pretty much always the same, but that's not a reason to copy it from one module to the other. Symfony provides a module generator that creates the whole action and template code to manipulate a Model object through symfony forms.
Conclusion
The symfony form component is an entire framework on its own. It facilitates the display of forms in the view through widgets, it facilitates validation and handling of forms in the controller through validators, and it facilitates the edition of Model objects through Model forms. Although designed with a clear MVC separation, the form sub-framework is always easy to use. Most of the time, code generation will reduce your custom form code to a few lines.
There is much more in symfony form classes than what this chapter exposes. In fact, there is an entire book describing all its features through usage examples. And if the form framework itself doesn't provide the widget or the validator you need, it is designed in such an extensible way that you will only need to write a single class to get exactly what you need.
インデックス
Document Index
関連ページリスト
Related Pages
 Chapter 1 - Introducing Symfony
- Chapter 2 - Exploring Symfony's Code
- Chapter 3 - Running Symfony
- Chapter 4 - The Basics Of Page Creation
- Chapter 5 - Configuring Symfony
- Chapter 6 - Inside The Controller Layer
- Chapter 7 - Inside The View Layer
- Chapter 8 - Inside The Model Layer (Doctrine)
- Chapter 9 - Links And The Routing System
- Chapter 10 - Forms
- Chapter 11 - Emails
- Chapter 12 - Caching
- Chapter 13 - I18n And L10n
- Chapter 14 - Admin Generator
- Chapter 15 - Unit And Functional Testing
- Chapter 16 - Application Management Tools
- Chapter 17 - Extending Symfony
- Chapter 18 - Performance
- Chapter 19 - Mastering Symfony's Configuration Files
- Appendix B - GNU Free Documentation License

日本語ドキュメント
Japanese Documents
- 2011/01/18 Chapter 17 - Extending Symfony
- 2011/01/18 The generator.yml Configuration File
- 2011/01/18 Les tâches
- 2011/01/18 Emails
- 2010/11/26 blogチュートリアル(8) ビューの作成