Enhance your Productivity
by Fabien Potencier
Using symfony itself is a great way to enhance your productivity as a web developer. Of course, everyone already knows how symfony's detailed exceptions and web debug toolbar can greatly enhance productivity. This chapter will teach you some tips and tricks to enhance your productivity even more by using some new or less well-known symfony features.
Start Faster: Customize the Project Creation Process
Thanks to the symfony CLI tool, creating a new symfony project is quick and simple:
$ php /path/to/symfony generate:project foo --orm=Doctrine
The generate:project task generates the default directory structure for your new project and creates configuration files with sensible defaults. You can then use other symfony tasks to create applications, install plugins, configure your model, and more.
But the first steps to create a new project are usually always quite the same: you create a main application, install a bunch of plugins, tweak some configuration defaults to your liking, and so on.
As of symfony 1.3, the project creation process can be customized and automated.
As all symfony tasks are classes, it's pretty easy to customize and extend them except. The
generate:projecttask, however, cannot be easily customized because no project exists when the task is executed.
The generate:project task takes an --installer option, which is a PHP script that will be executed during the project creation process:
$ php /path/to/symfony generate:project --installer=/somewhere/my_installer.php
The /somewhere/my_installer.php script will be executed in the context of the sfGenerateProjectTask instance, so it has access to the task's methods to by using the $this object. The following sections describe all the available methods you can use to customize your project creation process.
If you enable URL file-access for the
include()function in yourphp.ini, you can even pass a URL as an installer (of course you need to be very careful when doing this with a script you know nothing about):$ symfony generate:project --installer=http://example.com/sf_installer.php
installDir()
The installDir() method mirrors a directory structure (composed of sub-directories and files) in the newly created project:
$this->installDir(dirname(__FILE__).'/skeleton');
runTask()
The runTask() method executes a task. It takes the task name, and a string representing the arguments and the options you want to pass to it as arguments:
$this->runTask('configure:author', "'Fabien Potencier'");
Arguments and options can also be passed as arrays:
$this->runTask('configure:author', array('author' => 'Fabien Potencier'));
The task shortcut names also work as expected:
$this->runTask('cc');
This method can of course be used to install plugins:
$this->runTask('plugin:install', 'sfDoctrineGuardPlugin');
To install a specific version of a plugin, just pass the needed options:
$this->runTask('plugin:install', 'sfDoctrineGuardPlugin', array('release' => '10.0.0', 'stability' => beta'));
To execute a task from a freshly installed plugin, the tasks need to be reloaded first:
$this->reloadTasks();
If you create a new application and want to use tasks that relys on a specific application like generate:module, you must change the configuration context yourself:
$this->setConfiguration($this->createConfiguration('frontend', 'dev'));
Loggers
To give feedback to the developer when the installer script runs, you can log things pretty easily:
// a simple log
$this->log('some installation message');

// log a block
$this->logBlock('Fabien\'s Crazy Installer', 'ERROR_LARGE');

// log in a section
$this->logSection('install', 'install some crazy files');
User Interaction
The askConfirmation(), askAndValidate(), and ask() methods allow you to ask questions and make your installation process dynamically configurable.
If you just need a confirmation, use the askConfirmation() method:
if (!$this->askConfirmation('Are you sure you want to run this crazy installer?'))
{
  $this->logSection('install', 'You made the right choice!');

  return;
}
You can also ask any question and get the user's answer as a string by using the ask() method:
$secret = $this->ask('Give a unique string for the CSRF secret:');
And if you want to validate the answer, use the askAndValidate() method:
$validator = new sfValidatorEmail(array(), array('invalid' => 'hmmm, it does not look like an email!'));
$email = $this->askAndValidate('Please, give me your email:', $validator);
Filesystem Operations
If you want to do filesystem changes, you can access the symfony filesystem object:
$this->getFilesystem()->...();
The Sandbox Creation Process
The symfony sandbox is a pre-packaged symfony project with a ready-made application and a pre-configured SQLite database. Anybody can create a sandbox by using its installer script:
$ php symfony generate:project --installer=/path/to/symfony/data/bin/sandbox_installer.phpHave a look at the
symfony/data/bin/sandbox_installer.phpscript to have a working example of an installer script.
The installer script is just another PHP file. So, you can do pretty anything you want. Instead of running the same tasks again and again each time you create a new symfony project, you can create your own installer script and tweak your symfony project installations the way you want. Creating a new project with an installer is much faster and prevents you from missing steps. You can even share your installer script with others!
In Chapter 06, we will use a custom installer. The code for it can be found in Appendix B.
Develop Faster
From PHP code to CLI tasks, programming means a lot of typing. Let's see how to reduce this to the bare minimum.
Choosing your IDE
Using an IDE helps the developer to be more productive in more than one way.
First, most modern IDEs provide PHP autocompletion out of the box. This means that you only need to type the first few character of a method name. This also means that even if you don't remember the method name, you are not forced to have look at the API as the IDE will suggest all the available methods of the current object.
Additionally, some IDEs, like PHPEdit or Netbeans, know even more about symfony and provide specific integration with symfony projects.
Text Editors
Some users prefer to use a text editor for their programming work, mainly because text editors are faster than any IDE. Of course, text editors provide less IDE-oriented features. Most popular editors, however, offer plugins/extensions that can be used to enhance your user experience and make the editor work more efficiently with PHP and symfony projects.
For example, a lot of Linux users tends to use VIM for all their work. For these developers, the vim-symfony extension is available. VIM-symfony is a set of VIM scripts that integrates symfony into your favorite editor. Using vim-symfony, you can easily create vim macros and commands to streamline your symfony development. It also bundles a set of default commands that put a number of configuration files at your fingertips (schema, routing, etc) and enable you to easily switch from actions to templates.
Some MacOS X users use TextMate. These developers can install the symfony bundle, which adds a lot of time-saving macros and shortcuts for day-to-day activities.
Using an IDE that supports symfony
Some IDEs, like PHPEdit 3.4 and NetBeans 6.8, have native support for symfony, and so provide a finely-grained integration with the framework. Have a look at their documentation to learn more about their symfony specific support, and how it can help you develop faster.
Helping the IDE
PHP autocompletion in IDEs only works for methods that are explicitly defined in the PHP code. But if your code uses the __call() or __get() "magic" methods, IDEs have no way to guess the available methods or properties. The good news is that you can help most IDEs by providing the methods and/or properties in a PHPDoc block (by using the @method and @property annotations respectively).
Let's say you have a Message class with a dynamic property (message) and a dynamic method (getMessage()). The following code shows you how an IDE can know about them without any explicit definition in the PHP code:
/**
 * @property clob $message
 *
 * @method clob getMessage() Returns the current message value
 */
class Message
{
  public function __get()
  {
    // ...
  }

  public function __call()
  {
    // ...
  }
}
Even if the getMessage() method does not exist, it will be recognized by the IDE thanks to the @method annotation. The same goes for the message property as we have added a @property annotation.
This technique is used by the doctrine:build-model task. For instance, a Doctrine MailMessage class with two columns (message and priority) looks like the following:
/**
 * BaseMailMessage
 *
 * This class has been auto-generated by the Doctrine ORM Framework
 *
 * @property clob $message
 * @property integer $priority
 *
 * @method clob        getMessage()  Returns the current record's "message" value
 * @method integer     getPriority() Returns the current record's "priority" value
 * @method MailMessage setMessage()  Sets the current record's "message" value
 * @method MailMessage setPriority() Sets the current record's "priority" value
 *
 * @package    ##PACKAGE##
 * @subpackage ##SUBPACKAGE##
 * @author     ##NAME## <##EMAIL##>
 * @version    SVN: $Id: Builder.php 6508 2009-10-14 06:28:49Z jwage $
 */
abstract class BaseMailMessage extends sfDoctrineRecord
{
    public function setTableDefinition()
    {
        $this->setTableName('mail_message');
        $this->hasColumn('message', 'clob', null, array(
             'type' => 'clob',
             'notnull' => true,
             ));
        $this->hasColumn('priority', 'integer', null, array(
             'type' => 'integer',
             ));
    }

    public function setUp()
    {
        parent::setUp();
        $timestampable0 = new Doctrine_Template_Timestampable();
        $this->actAs($timestampable0);
    }
}
Find Documentation Faster
As symfony is a large framework with many features, it is not always easy to remember all the configuration possibilities, or all the classes and methods at your disposal. As we have seen before, using an IDE can go a long way in providing you autocompletion. Let's explore how existing tools can be leveraged to find answers as fast as possible.
Online API
The fastest way to find documentation about a class or a method is to browse the online API.
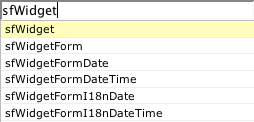
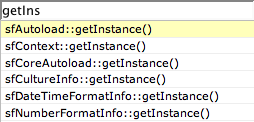
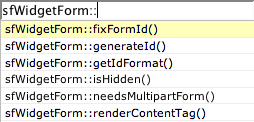
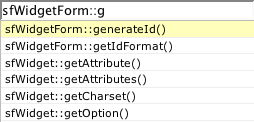
Even more interesting is the built-in API search engine. The search allows you to rapidly find a class or a method with only a few keystrokes. After entering a few letters into the search box of the API page, a quick search results box will appear in real-time with useful suggestions.
You can search by typing the beginning of a class name:

or of a method name:

or a class name followed by :: to list all available methods:

or enter the beginning of a method name to further refine the possibilities:

If you want to list all classes of a package, just type the package name and submit the request.
You can even integrate the symfony API search in your browser. This way, you don't even need to navigate to the symfony website to look for something. This is possible because we provide native OpenSearch support for the symfony API.
If you use Firefox, the symfony API search engines will show up automatically in the search engine menu. You can also click on the "API OpenSearch" link from the API documentation section to add one of them to your browser search box.
You can have a look at a screencast that shows how the symfony API search engine integrates well with Firefox on the symfony blog.
Cheat Sheets
If you want to quickly access information about the main parts of the framework, a large collection of cheat sheets is available:
- Directory Structure and CLI
- View
- View: Partials, Components, Slots and Component Slots
- Lime Unit & Functional Testing
- ORM
- Propel
- Propel Schema
- Doctrine
Some of these cheat sheets have not yet been updated for symfony 1.3.
Offline Documentation
Questions about configuration are best answered by the symfony reference guide. This is a book you should keep with you whenever you develop with symfony. The book is the fastest way to find every available configuration thanks to a very detailed table of contents, an index of terms, cross-references inside the chapters, tables, and much more.
You can browse this book online, buy a printed copy of it, or even download a PDF version.
Online Tools
As seen at the beginning of this chapter, symfony provides a nice toolset to help you get started faster. Eventually, you will finish your project, and it will be time to deploy it to production.
To check that your project is ready for deployment, you can use the online deployment checklist. This website covers the major points you need to check before going to production.
Debug Faster
When an error occurs in the development environment, symfony displays a nice exception page filled with useful information. You can, for instance, have a look at the stack trace and the files that have been executed. If you setup the ~sf_file_link_format~ setting in the settings.yml configuration file (see below), you can even click on the filenames and the related file will be opened at the right line in your favorite text editor or IDE. This is a great example of a very small feature that can save you tons of time when debugging a problem.
The log and view panels in the web debug toolbar also display filenames (especially when XDebug is enabled) that become clickable when you set the
sf_file_link_formatsetting.
By default, the sf_file_link_format is empty and symfony defaults to the value of the xdebug.file_link_format PHP configuration value if it exists (setting xdebug.file_link_format in php.ini allows recent versions of XDebug to add links for all filenames in the stack trace).
The value for sf_file_link_format depends on your IDE and Operating System. For instance, if you want to open files in ~TextMate~, add the following to settings.yml:
---
dev:
  .settings:
    file_link_format: txmt
The %f placeholder is replaced by symfony with the absolute path of the file and the %l placeholder is replaced with the line number.
If you use VIM, the configuration is more involved and is described online for symfony and XDebug.
Use your favorite search engine to learn how to configure your IDE. You can look for configuration of the
sf_file_link_formatorxdebug.file_link_formatas both work in the same way.
Test Faster
Record Your Functional Tests
Functional tests simulate user interaction to thoroughly test the integration of all the pieces of your application. Writing functional tests is easy but time consuming. But as each functional test file is a scenario that simulates a user browsing your website, and because browsing an application is faster than writing PHP code, what if you could record a browser session and have it automatically converted to PHP code? Thankfully, symfony has such a plugin. It's called swFunctionalTestGenerationPlugin, and it allows you to generate ready-to-be-customized test skeletons in a matter of minutes. Of course, you will still need to add the proper tester calls to make it useful, but this is nonetheless a great time-saver.
The plugin works by registering a symfony filter that will intercept all requests, and convert them to functional test code. After installing the plugin the usual way, you need to enable it. Open the filters.yml of your application and add the following lines after the comment line:
functional_test:
  class: swFilterFunctionalTest
Next, enable the plugin in your ProjectConfiguration class:
// config/ProjectConfiguration.class.php
class ProjectConfiguration extends sfProjectConfiguration
{
  public function setup()
  {
    // ...

    $this->enablePlugin('swFunctionalTestGenerationPlugin');
  }
}
As the plugin uses the web debug toolbar as its main user interface, be sure to have it enabled (which the case in the development environment by default). When enabled, a new menu named "Functional Test" is made available. In this panel, you can start recording a session by clicking on the "Activate" link, and reset the current session by clicking on "Reset". When you are done, copy and paste the code from the textarea to a test file and start customizing it.
Run your Test Suite faster
When you have a large suite of tests, it can be very time consuming to launch all tests every time you make a change, especially if some tests fail. Each time you fix a test, you should run the whole test suite again to ensure that you have not broken other tests. But until the failed tests are fixed, there is no point in re-executing all the other tests. To speed up this process, the test:all task has an --only-failed (-f as a shortcut) option that forces the task to only re-execute tests that failed during the previous run:
$ php symfony test:all --only-failed
On first execution, all tests are run as usual. But for subsequent test runs, only tests that failed last time are executed. As you fix your code, some tests will pass, and will be removed from subsequent runs. When all tests pass again, the full test suite is run... you can then rinse and repeat.
インデックス
Document Index
関連ページリスト
Related Pages
 Introduction
 Advanced Routing
 Enhance your Productivity
 Emails
 Custom Widgets and Validators
 Advanced Forms
 Extending the Web Debug Toolbar
 Advanced Doctrine Usage
 Taking Advantage of Doctrine Table Inheritance
 Symfony Internals
 Windows and symfony
 Developing for Facebook
 Leveraging the Power of the Command Line
 Playing with symfony's Config Cache
 Working with the symfony Community
 Appendix A - JavaScript code for sfWidgetFormGMapAddress
 About the Authors
 Appendix B - Custom Installer Example
 Appendix C - License

日本語ドキュメント
Japanese Documents
 2011/01/18 Chapter 17 - Extending Symfony
 2011/01/18 The generator.yml Configuration File
 2011/01/18 Les tâches
 2011/01/18 Emails
 2010/11/26 blogチュートリアル(8) ビューの作成


